Introduction
You should be writing tests for your code so that you can catch any changes that might break your code.
jest and react-testing-library
We use jest and react-testing-library, rtl/RTL for short, when testing our React code.
Installation
jest and react-testing-library already come bundled with CRA. If you have a look at package.json, you will see that that react-testing-library is already installed.
"@testing-library/jest-dom": "^x.x.x",
"@testing-library/react": "^x.x.x",
"@testing-library/user-event": "^x.x.x",
Running tests
We can run tests with npm run test or yarn run test.
NOTE: In the examples, we are running Jest in
watchmode. This should automatically happen for you when you run the above commands, however if you aren’t inwatchmode then you can runnpm run test --watch.
How react-testing-library works
We typically render a component and then check that the content is being rendered correctly. This can include a set of actions we give and then checking what has been rendered to the screen.
An example of this could be loading a list of data to a component. The component would take in an array of data and then display it, or even possibly filtering or sorting the content first and then displaying it. We would test this by have a small set of static data in our test, passing this into the component and then checking that the component rendered our list of items correctly. For example, e could give the component an unsorted list of data, then in our test check that the information rendered by the component matches with a sorted listed of data we created in our test.
Creating a test file
We can position our tests files in of 2 way:
-
Add
testto the file name e.g.index.test.jsorMyComponent.test.js. We typically do this when we colocate our test files, which is recommended. -
We create a
__tests__folder in thesrcfolder and then mimic our folder structure of our components in the__tests__folder i.e. if we had a component/MyComponent/index.jsthen we’d have the test folder and file__tests__/MyComponent/index.js. This method of creating tests requires more maintenance as you have to always mimic your folder structure.
Writing a basic test and running our tests
We will look at writing a basic test and then running our tests.
Navigate to App.test.js and delete the contents of the file.
Add the following code:
describe('Demo tests', () => {
  test('1 is equal to 1', () => {
    expect(1).toBe(1);
  });
});
Let’s briefly look at the test above.
describe is used to keep our tests together.
We then write a test inside of the describe block, which tests that the value of 1 will be equal to 1. This test will always pass since 1 will always equal 1.
Let’s now run the tests.
Run npm run tests in the root of your project.
You will now see something similar to below:
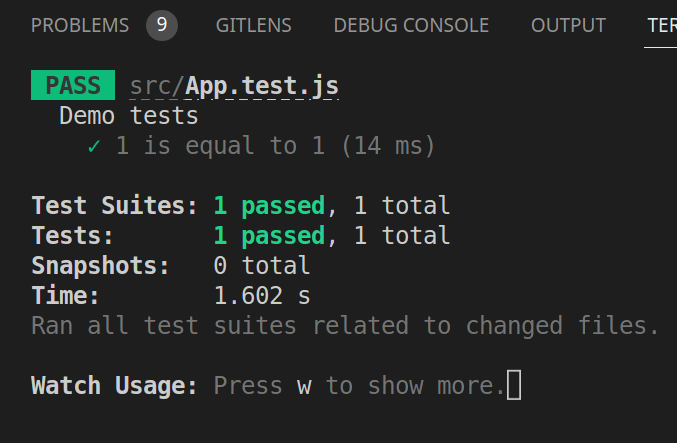
This shows that our tests and setup are working.
Testing a component
We are now going to test a component.
We will start off by creating a new component, ProductCard.
This component will take in title, body and price props and display them.
It also contains a button. We pass in a callback function, onAddToCartClick which gets called when we click the button. This function passes the index of the product passed in.
/src/components/ProductCard/index.jsx.
import React from 'react';

function ProductCard({ index, title, description, price, onAddToCartClick }) {
  return (
    <div>
      <h2>{title}</h2>
      <p>{description}</p>
      <div>{price}</div>
      <button onClick={() => onAddToCartClick(index)}>Add to cart</button>
    </div>
  );
}

export default ProductCard;
To use the component, we would call the ProductCard component as follows.
Take note how we are passing in the addToCart function into our ProductCard component. This allows us to have one single function that handles items being added to our cart.
The first parameter of the addToCart function is a product index being passed through, which we have called productIndex. We can use this index to add an item to a cart.
import React from 'react';
import ProductCard from './ProductCard';

function App() {
  function addToCart(productIndex) {
    console.log('Adding to cart, index:', productIndex);
  }
  return (
    <ProductCard
      index="0"
      title="Milk"
      description="Fresh milk that was locally sourced."
      price={9.99}
      onAddToCartClick={addToCart}
    />
  );
}

export default App;
Testing the component
We now want to test the above component.
We test this by:
- Checking that props passed into the component are visible on the screen.
- A callback function passed into the component gets called when the button inside of the component is clicked.
Let’s begin by creating our test file.
We create our test file in /src/components/ProductCard/ i.e. /src/components/ProductCard/index.test.jsx.
We now add some basic boilerplate. Add the following to the test file in /ProductCard i.e. /ProductCard/index.test.jsx.
describe('ProductCard', () => {
  test('displays information correctly', () => {
    expect(1).toBe(1);
  });
});
Run our tests (npm run test) and we’ll see that our test passes because 1 will always be 1.
This was setup simply to make sure our test file is correctly setup. Let’s now begin with writing our tests.
rendering a component
We will render our component to the screen with specific props then check that our props are visible on the screen. This screen isn’t visible to us, it’s instead kept in memory.
We will import render and screen from rtl:
import { render, screen } from '@testing-library/react';
The render function is what “renders” our DOM to the page. We will then also make use of the screen function to show what our DOM looks like.
/ProductCard/index.test.jsx
import { render, screen } from '@testing-library/react';
import ProductCard from './ProductCard';

describe('ProductCard', () => {
  test('displays information correctly', () => {
    render(
      <ProductCard
        title="Milk"
        description="It's good for you"
        price="19.99"
      />,
    );

    // Displays our DOM for debugging purposes
    screen.debug();
  });
});
Your test will look similar to the following:
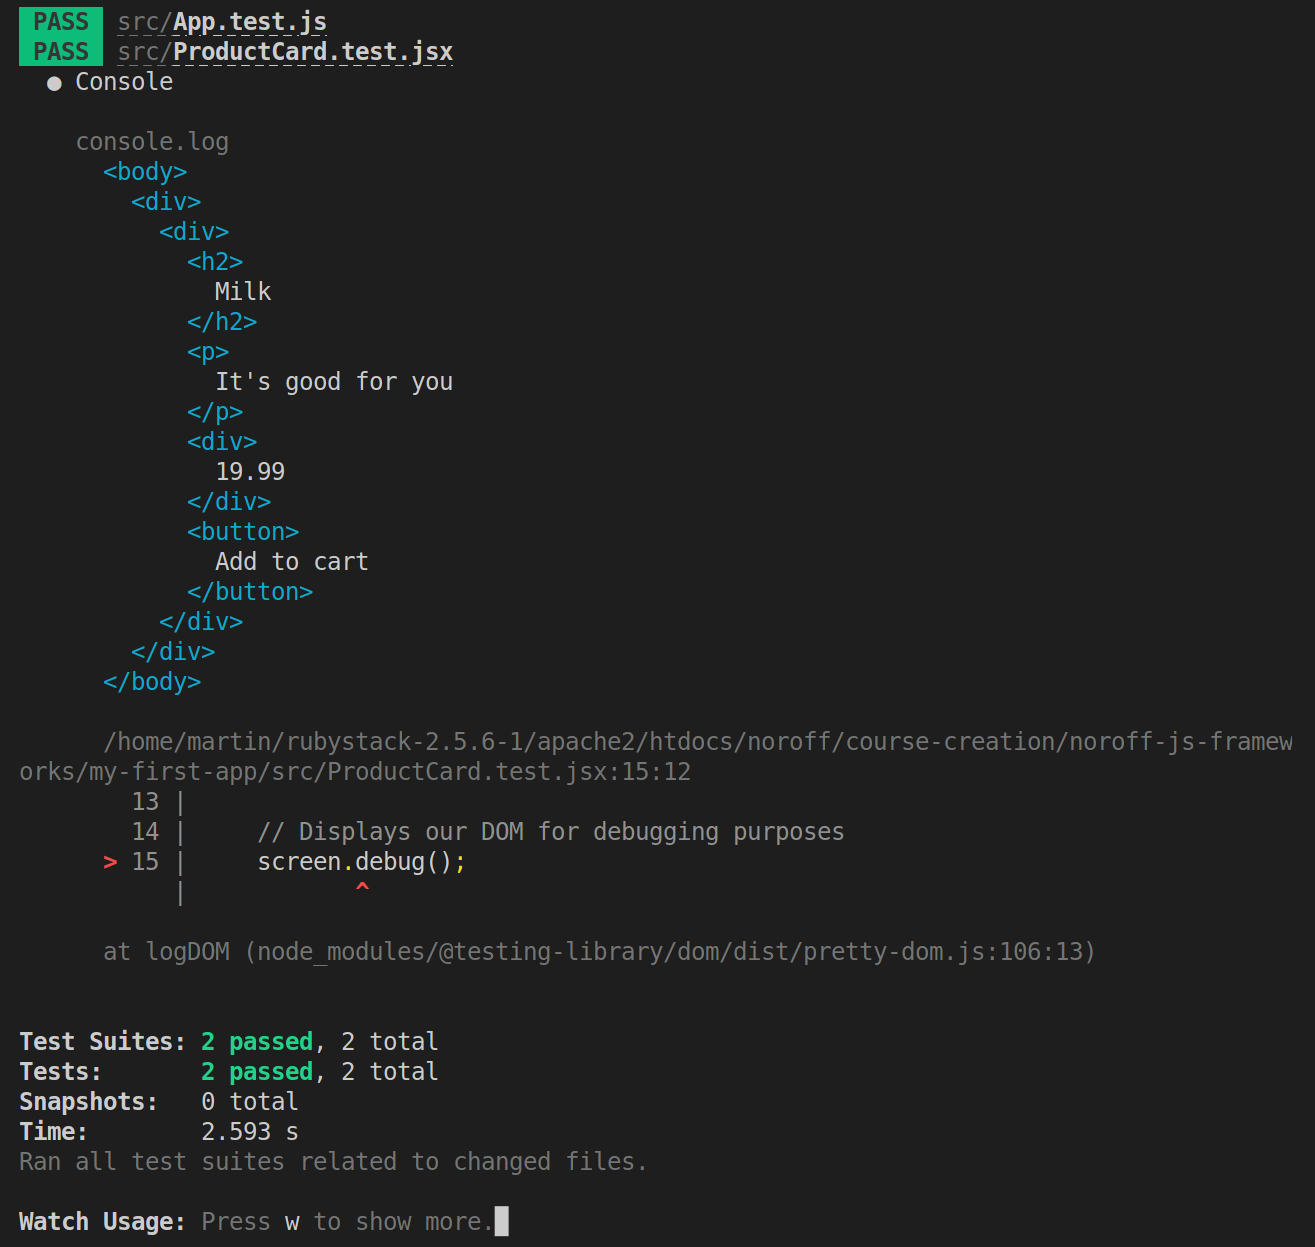
We can see in the screenshot above that HTML is generated. The whole App wasn’t rendered, only our component was.
We can see that our props passed in are present in the DOM. We want to write a test to ensure this by making sure the props we pass in are present on the page.
Testing our props
In the example below we use the getByText function to check if a string we give the function is present in the document.
We use the getByText() function available on screen to check that certain text is available in the document.
import { render, screen } from '@testing-library/react';
import ProductCard from './ProductCard';

describe('ProductCard', () => {
  test('displays information correctly', () => {
    render(
      <ProductCard
        title="Milk"
        description="It's good for you"
        price="19.99"
      />,
    );

    // Test for each of the fields
    expect(screen.getByText('Milk')).toBeInTheDocument();
    expect(screen.getByText("It's good for you")).toBeInTheDocument();
    expect(screen.getByText('19.99')).toBeInTheDocument();
  });
});
Testing our callback
Our component takes a callback function. We should test this to ensure it works as expected.
We will create a fake Jest function, then check that this function was called by our component. A fake Jest function provides us with useful information, such as has the fake function been called, how many times and with what arguments.
We create our fake Jest function with const mockCallback = jest.fn(). This has created a fake Jest function and assigned it to a variable we called mockCallback.
We then test simulate a click with the fireEvent function exported by rtl:
const addToCartButton = screen.getByRole('button');
fireEvent.click(addToCartButton);
Lastly, we check that our mock function was called only once:
expect(mockCallback).toHaveBeenCalledTimes(1);
Example below:
import { render, screen, fireEvent } from '@testing-library/react';
import ProductCard from './ProductCard';

describe('ProductCard', () => {
  test('displays information correctly', () => {
    const mockCallback = jest.fn();
    render(
      <ProductCard
        title="Milk"
        description="It's good for you"
        price="19.99"
        onAddToCartClick={mockCallback}
      />,
    );

    const addToCartButton = screen.getByRole('button');
    fireEvent.click(addToCartButton);

    expect(mockCallback).toHaveBeenCalledTimes(1);
  });
});
Lesson task
Goal
For the student to demonstrate they can write React tests.
Brief
We will create a component that renders a list of items. We will write a test to check that data we pass into the component is displayed on the screen.
NOTE: Lesson tasks do not get submitted on Moodle and are not assessed by tutors. They are mainly there for you to practise what you have learned in the lesson.
Level 1 process
API end-point: https://v2.api.noroff.dev/online-shop
-
Create a new CRA or reuse an existing one.
-
Create a component called
ProductList. This component will loop through data and display each item in aProductcomponent. -
Create a component called
Productwhich will take props fromProductList. Display 3 items from the data. -
Use the API end-point provided and display this data in
ProductListby using a map to loop through data and using theProductto display each item. -
Create a test for
ProductListand pass in the example data. Check that the 3 items you’ve chosen to display match the test data.