Introduction
react-hook-form makes handling of forms and form validation easier.
react-hook-form
In this lesson we will be looking at react-hook-form which is a library that makes it easier to create forms and handle form validation.
Installing react-hook-form
Installing react-hook-form is straightforward, simply run one of the following commands:
npm:
npm install react-hook-form
yarn:
yarn add react-hook-form
Basic example
We will now have a look at a basic example of using react-hook-form.
We start by importing the useForm hook from react-hook-form.
Inside of App.js, we destructure register and handleSubmit from the useForm() hook.
There are now two parts to take note of:
1. handleSubmit()
This function will receive the form data if the validation of the form was successful.
2. {...register("variableName")}
This registers an input with react-hook-form by creating a reference (ref). This is mostly so that validation can take place.
We use ...register to register an input. We must pass a name that will be used for the input, which should be done as camelCase.
Example code
Let’s now take a look at the code to see how handleSubmit() and ...register is used:
import React from 'react';
import { useForm } from 'react-hook-form';

function App() {
  const { register, handleSubmit } = useForm();

  function onSubmit(data) {
    console.log(data);
  }

  return (
    <form onSubmit={handleSubmit(onSubmit)}>
      <input {...register('firstName')} />
      <input {...register('lastName')} />
      <select {...register('role')}>
        <option value="developer">Developer</option>
        <option value="designer">Designer</option>
        <option value="admin">Admin</option>
        <option value="other">Other</option>
      </select>
      <input type="submit" />
    </form>
  );
}

export default App;
Validation example
We will now look at adding validation.
We add validation as a 2nd optional argument in ref function {...register}. For example, if we wanted to add a required field then our input would look as follows:
<input {...register('firstName', { required: true })} />
NOTE: You can have a look at https://react-hook-form.com/api/useform/register to see the validation properties available. Among these are
man,maxandpatternfor a Regex pattern.
In the example below, we have two inputs.
-
firstName: This is a text field that isrequired, has minimum length of 3 and a maximum length of 30. -
age: This is a number field which is required, has a minimum value of 18 and a maximum value of 200.
import React from 'react';
import { useForm } from 'react-hook-form';

function App() {
  const { register, handleSubmit } = useForm();

  function onSubmit(data) {
    console.log(data);
  }

  return (
    <form onSubmit={handleSubmit(onSubmit)}>
      <input
        {...register('firstName', {
          required: true,
          minLength: 3,
          maxLength: 30,
        })}
      />
      <input
        type="number"
        {...register('age', { required: true, min: 18, max: 200 })}
      />
      <input type="submit" />
    </form>
  );
}

export default App;
yup
We will now add yup validation.
yup is a library that is often used for handling validation. It works by creating a schema.
Installing yup
Run one of the following commands to install yup:
npm:
npm install @hookform/resolvers yup
yarn:
yarn add @hookform/resolvers yup
Adding validation with yup
We will now add validation with yup.
Imports
We start by importing our dependencies:
import React from 'react';
import { useForm } from 'react-hook-form';
import { yupResolver } from '@hookform/resolvers/yup';
import * as yup from 'yup';
We then create our schema for validation.
Schema object
We create an object which property keys that must match with the names we pass to our inputs in the ref {...register} argument.
const schema = yup
  .object({
    // This is for the input with "firstName" as its ref in {...register}
    firstName: yup.string().min(3).max(10).required(),
    // This is for the input with "age" as its ref in {...register}
    age: yup.number().positive().integer().required(),
  })
  .required();
In the properties we can add our validation with yup.
For firstName, we have specified that is must be a string(), have a minimum length of 3 (min(3)), a maximum length of 10 (max(10)), and is required.
For age we have specified that it must be a number that is positive, and is required.
Adding yup to our App
Inside of our component we use the useForm hook like we did previously, however there are a couple of differences. This time we are destructuring an error state (formState: {errors}), and we are passing in our yup resolver.
const {
  register,
  handleSubmit,
  formState: { errors },
} = useForm({
  resolver: yupResolver(schema),
});
Inputs
Our inputs are the same as we’d use with react-hook-form, however we have added a <p> element that will contain our error messages. yup will handle the error messages for us which is a great benefit.
<input {...register('firstName')} />
<p>{errors.firstName?.message}</p>
Example
Below is an example of all the pieces put together.
import React from 'react';
import { useForm } from 'react-hook-form';
import { yupResolver } from '@hookform/resolvers/yup';
import * as yup from 'yup';

const schema = yup
  .object({
    firstName: yup.string().min(3).max(10).required(),
    age: yup.number().positive().integer().required(),
  })
  .required();

function App() {
  const {
    register,
    handleSubmit,
    formState: { errors },
  } = useForm({
    resolver: yupResolver(schema),
  });

  function onSubmit(data) {
    console.log(data);
  }

  return (
    <form onSubmit={handleSubmit(onSubmit)}>
      <input {...register('firstName')} />
      <p>{errors.firstName?.message}</p>
      <input {...register('age')} />
      <p>{errors.age?.message}</p>
      <input type="submit" />
    </form>
  );
}

export default App;
If we try submit the form, you will see that we automatically have error messages shown in the <p> elements which contain our errors.
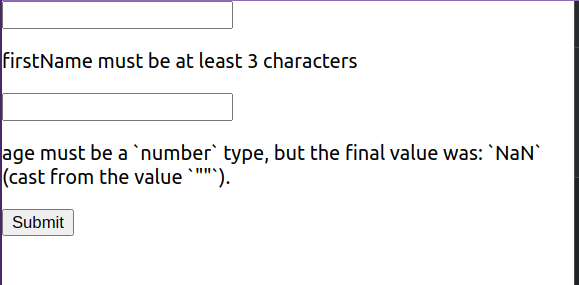
Above: Yup error messages showing
Custom yup error messages
We can have our own custom error messages instead of the default ones that yup generates.
The 2nd argument to the yup validation functions, such as min and max, is a custom error message which be used in the errors object returned by the react-hook-form hook.
import React from 'react';
import { useForm } from 'react-hook-form';
import { yupResolver } from '@hookform/resolvers/yup';
import * as yup from 'yup';

const schema = yup
  .object({
    firstName: yup
      .string()
      .min(3, 'Your first name should be at least 3 characters.')
      .max(10, 'Your first name cannot be longer than 10 characters.')
      .required('Please enter your first name'),
    age: yup
      .number()
      .min(18, 'Your age must be 18 or higher')
      .max(100, 'Your age must be 100 or lower')
      .typeError('Your age must be a number'),
  })
  .required();

function App() {
  const {
    register,
    handleSubmit,
    formState: { errors },
  } = useForm({
    resolver: yupResolver(schema),
  });

  function onSubmit(data) {
    console.log(data);
  }

  return (
    <form onSubmit={handleSubmit(onSubmit)}>
      <input {...register('firstName')} />
      <p>{errors.firstName?.message}</p>
      <input {...register('age')} />
      <p>{errors.age?.message}</p>
      <input type="submit" />
    </form>
  );
}

export default App;
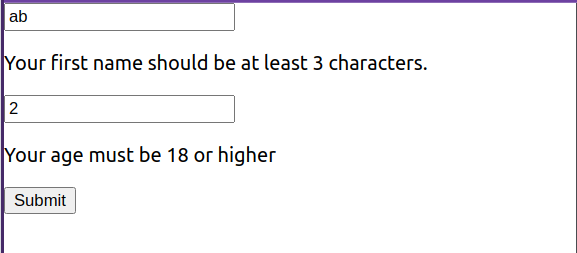
Above: Custom validation being used
Lesson task
Goal
For the student to demonstrate that they can use react-hook-form with yup.
Brief
You will create a form react-hook-form with yup validation and custom validation messages.
NOTE: Lesson tasks do not get submitted on Moodle and are not assessed by tutors. They are mainly there for you to practise what you have learned in the lesson.
Level 1 process
-
Create a new CRA or reuse an existing one.
-
In
App.js, or another component, create a form that contains the following inputs.2.1
fullName: A string. Must be greater than 3 characters and less than 50 characters. Required field.2.2
email: A string. Must be a valid email address (useemail()or a Regex pattern). Required field.2.3
subject: A string. Must be greater than 3 characters and less than 100 characters. Required field.2.4
body: A string. Must be greater than 3 characters and less than 1000 characters. Required field.