Introduction
Routing in React refers to navigating and linking between different pages in React.
Why use a router
We can’t navigate internally to pages in a React app with a normal <a> anchor link because of React being a SPA (Single Page Application). A SPA like React will only load a single HTML page, then use JavaScript to update the content without reloading the HTML page. If you were to use a normal <a> anchor link then a network request would be performed and a new HTML page would be fetched. This would lead to our entire app reloading which is not what we want.
We would instead use a routing library such as React Router. React Router will provide us with a ways to navigate within our app.
Installing React Router
To install React Router to an app you simply install the library:
npm install react-router-dom
How React Router works
There are two fundamentals of React Router which is
-
Creating the route
-
Linking to the route
1. Creating the route
We create a route by using a <Route> component exported by react-router-dom.
This component has two props we’re currently interested in which are:
path: This is the path for our route e.g. path="/products" would provide a route for /products in our URL
element: This is the element that will be displayed when navigating to the path.
The following example would create a route for /products and display <div>Products</div> if this route was matched. The example uses inline JSX in the element prop, but you would usually have a component here.
<Route path="products" element={<div>Products</div>} />
NOTE: Your
<Route>components will need to be nested within a<Routes>component exported byreact-router-dom. You will also need to wrap your app with a<BrowserRouter>component. Your routes should sit at the top level of your App, such as inApp.js.
NOTE: We can use a path of
*as a “catch-all” for all our routes. We can use this like a 404 page.
2. Linking to a route
We use the <Link> component exported by react-router-dom to link to a route. The <Link> component will render and function similar to a normal <a> link in the HTML, but without reloading the App.
The <Link> component takes a to prop which is where we add the path we want to link to.
The following example would create a link to the /products route.
<Link to="/products">Products</Link>
NavLink
We can use the <NavLink> component exported by react-router-dom when we want to style our links differently when they are active. Typically we would use this in a navigation bar.
Functionality wise, it’s similar to the <Link> component, but it will add a class of active to the link when the route is active.
The following example showcases a <NavLink> for the /products route. When this route is active, the link receives the active class, which we then target in CSS for styling.
<nav id="navbar">
  <NavLink to="/products">Products</NavLink>
</nav>
#navbar a.active {
  color: red;
}
#navbar a {
  color: black;
}
A basic example
We will now look at a basic example that puts the above into practice.
App.js
import React from "react"
import { BrowserRouter, Routes, Route, Link } from "react-router-dom"

function App() {
  return (
    <BrowserRouter>
      <nav>
        <ul>
          <li>
            <Link to="/">Home</Link>
          </li>
          <li>
            <Link to="/products">Products</Link>
          </li>
        </ul>
      </nav>
      <Routes>
        <Route index element={<div>Home</div>} />
        <Route path="products" element={<div>Products</div>} />
        <Route path="*" element={<div>Route not found</div>} />
      </Routes>
    </BrowserRouter>
  )
}

export default App
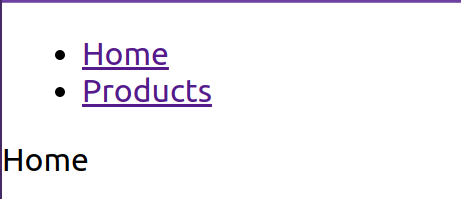
Above: The above example running as an App
Cleaning up:
Before we move on to more complex concepts, there is a small amount of cleaning up we should do.
Move <BrowserRouter> to index.js
We should move the <BrowserRouter> wrapper outside of App.js and into index.js. This will make our App.js file cleaner.
index.js
// ...imports above

const root = ReactDOM.createRoot(document.getElementById("root"))
root.render(
  <BrowserRouter>
    <App />
  </BrowserRouter>
)
Create components instead of inline JSX
We should abstract our nav links into their own component, which we will call <Nav>.
We will also create a component for our Home page, Products page and catch-all error page instead of them being inline JSX.
NOTE: You should have components in their own files, but in the examples they are all dealt with in
App.jsso that the code is more concise and easier to understand.
import React from "react"
import { Routes, Route, Link } from "react-router-dom"

function Home() {
  return <div>Home</div>
}

function Products() {
  return <div>Products</div>
}

function RouteNotFound() {
  return <div>Page not found</div>
}

function Nav() {
  return (
    <nav>
      <ul>
        <li>
          <Link to="/">Home</Link>
        </li>
        <li>
          <Link to="/products">Products</Link>
        </li>
      </ul>
    </nav>
  )
}

function App() {
  return (
    <div>
      <Nav />
      <Routes>
        <Route index element={<Home />} />
        <Route path="products" element={<Products />} />
        <Route path="*" element={<RouteNotFound />} />
      </Routes>
    </div>
  )
}

export default App
<Outlet> and creating a <Layout> component
When we have a website we typically have a set layout, such as a header and footer. In React, we would create <Header> and <Footer> components that contain our headers and footers. We could include these <Header> and <Footer> components in each of our page components but this would be redundant. It would be more efficient to have a component that contains our <Header>/<Footer> layout and then all of our pages would use this layout component. If we ever needed to make changes to our main page layout then we’d only need to change our code in one place.
react-router-dom provides an <Outlet /> component. <Outlet> will allow you to make a route and then have any nested routes use the layout of this parent route.
In the example below we will do the following:
-
Create a
<Header>and<Footer>component. -
Create a
<Layout>component and add the<Header>and<Footer>components to this component, along with the<Outlet>. -
We then wrap our routes with another route that contains our
<Layout>component.
import React from "react"
import { Routes, Route, Link, Outlet } from "react-router-dom"

function Home() {
  return <div>Home</div>
}

function Products() {
  return <div>Products</div>
}

function RouteNotFound() {
  return <div>Page not found</div>
}

function Nav() {
  return (
    <nav>
      <ul>
        <li>
          <Link to="/">Home</Link>
        </li>
        <li>
          <Link to="/products">Products</Link>
        </li>
      </ul>
    </nav>
  )
}

// Our header component that gets used in our <Layout> component
function Header() {
  return (
    <header>
      <div>Header with Logo and nav</div>
      <Nav />
    </header>
  )
}

// Our footer component that gets used in our <Layout> component
function Footer() {
  return <footer>Website footer</footer>
}

// The <Outlet> from react-router-dom displays any child routes, almost like
// passing through "children" in a component
function Layout() {
  return (
    <div>
      <Header />
      <Outlet />
      <Footer />
    </div>
  )
}

function App() {
  return (
    <div>
      <Routes>
        <Route path="/" element={<Layout />}>
          <Route index element={<Home />} />
          <Route path="products" element={<Products />} />
          <Route path="*" element={<RouteNotFound />} />
        </Route>
      </Routes>
    </div>
  )
}

export default App
Using “dynamic segments”
Dynamic segments start with : and allow for there to be dynamic paths.
For example, we have a route such as product/:id which would then match any value added to the product/ route such as product/1, product/2, product/3 etc.
<Route path="product/:id" element={<Product />} />
We can then easily get this value with the useParams hook provided by react-router-dom which returns an object with the dynamic segment value.
This makes it easy to reuse a single component dynamically, and is ideal for when you need a value such as an id to do an API request for a single item.
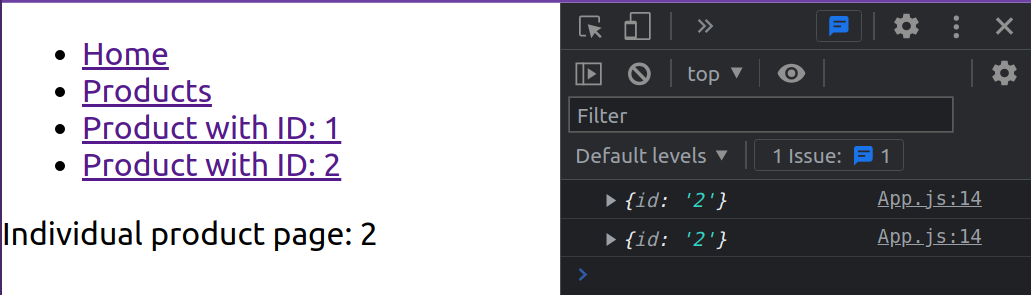
In the example below have added a <Product> route with a dynamic segment as well as a component. We then link to /product/1 and product/2. The component we created will display and log the id from the dynamic segment.
import React from "react"
import { Routes, Route, Link, useParams } from "react-router-dom"

function Home() {
  return <div>Home</div>
}

function Products() {
  return <div>Products</div>
}

function Product() {
  let params = useParams()
  console.log(params)
  // Logs the id of whichever product page you are on e.g.
  // {id: '1'} or {id: '2'}
  return <div>Individual product page: {params.id}</div>
}

function RouteNotFound() {
  return <div>Page not found</div>
}

function Nav() {
  return (
    <nav>
      <ul>
        <li>
          <Link to="/">Home</Link>
        </li>
        <li>
          <Link to="/products">Products</Link>
        </li>
        <li>
          <Link to="/product/1">Product with ID: 1</Link>
        </li>
        <li>
          <Link to="/product/2">Product with ID: 2</Link>
        </li>
      </ul>
    </nav>
  )
}

function App() {
  return (
    <div>
      <Nav />
      <Routes>
        <Route index element={<Home />} />
        <Route path="products" element={<Products />} />
        <Route path="product/:id" element={<Product />} />
        <Route path="*" element={<RouteNotFound />} />
      </Routes>
    </div>
  )
}

export default App
Lesson task
Goal
For the student to demonstrate they can use react-router.
Brief
We are going to create a basic class based on what you have learnt so far.
NOTE: Lesson tasks do not get submitted on Moodle and are not assessed by tutors. They are mainly there for you to practise what you have learned in the lesson.
Level 1 process
-
Start with a new CRA or reuse an existing one.
-
Add React Router.
-
Create 3 pages:
<Home>,<Products>and<Contact>. -
Create
<Header>and<Footer>components. -
Create a
<Nav>component with links to your pages and add it to your<Header>component. -
Create a
<Layout>component with an<Outlet>, and add the<Header>and<Footer>components to this<Layout>component. -
Create the routing for your pages, making sure to use the
<Layout>component. -
Create another page component,
<Product>, that is a dynamic segment with anidvalue. In this component, log the parameter. Add links to test values e.g.product/1and then test that it’s working.