Introduction
Actions are reusable blocks of code that run in the cloud instead of on your local machine or web server. There are many uses for actions, including:
- Automatically testing code
- Automatically building code
- Automatically deploying builds
Actions are written in YAML - a simple language designed to store configuration information. In this lesson, we will cover YAML syntax as well as some example actions that may be useful for existing projects.
YAML
YAML is a scripting language that defines how a server should handle a given task. The syntax is designed to be clear and easy to read, with as few special characters as possible.
Let’s compare some identical examples in JSON and YAML:
| Name | YAML | JSON |
|---|---|---|
| String | Hello World |
"Hello World" |
| Number | 42 |
42 |
| String Array | - apples, - oranges, - mangos |
[ "apples", "oranges", "mangos" ] |
| Object | apples: true oranges: false mangos: null |
{
  "apples": true,
  "oranges": false,
  "mangos": null
} |
| Variables | values: - &appleStock 120 - &orangeStock 12 - &mangoStock 0 stocklist: apples: *appleStock oranges: *orangeStock mangos: *mangoStock |
{
  "values": [
    120,
    12,
    0
  ],
  "stocklist": {
    "apples": 120,
    "oranges": 12,
    "mangos": 0
  }
} |
This is only a small sample of the YAML syntax. For more information, see the YAML documentation
Syntax
By comparing these examples above, it should be clear that there is a relationship between JSON Encoding and YAML Encoding. If you are familiar with JSON then YAML should be something to adapt to, rather than learn.
The difference betweeen
JSONandYAMLis similar to the difference betweenSCSSandSASSsyntax - both perform the same role but use either{}brackets or whitespace indentation to define structure.
Setup
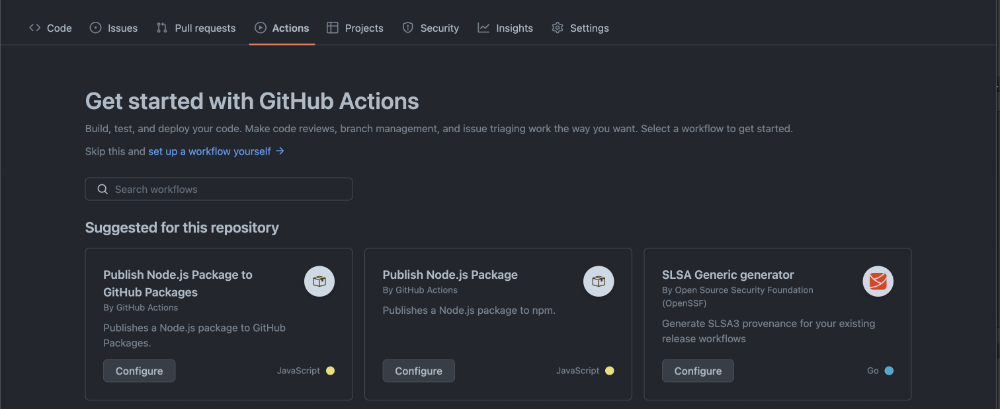
Before we write our first YAML Actions, we require an environment to run and test our code. Create a new public remote repository using GitHub and navigate to the Actions tab.
There are many Action templates to choose from, and they often meet our requirements well with only a small amount of customisation. Instead of selecting one of these templates, click “set up a workflow yourself”.
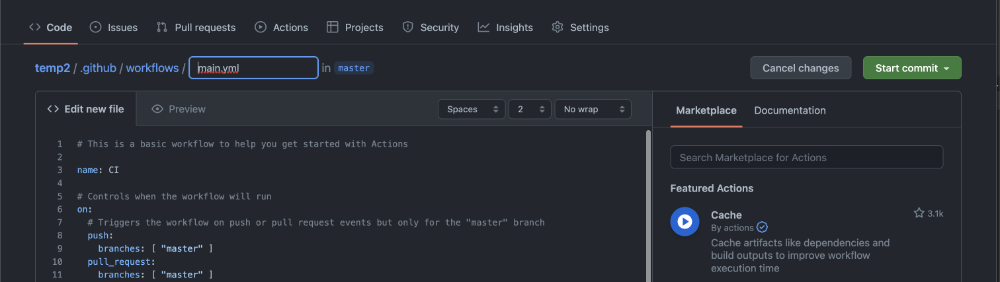
Anatomy of an Action
A newly created Action contains boilerplate code intended to speed up development by providing some useful tasks predefined. Let’s examine this boilerplate file:
# This is a basic workflow to help you get started with Actions

name: CI

# Controls when the workflow will run
on:
  # Triggers the workflow on push or pull request events but only for the "master" branch
  push:
    branches: [ "master" ]
  pull_request:
    branches: [ "master" ]

  # Allows you to run this workflow manually from the Actions tab
  workflow_dispatch:

# A workflow run is made up of one or more jobs that can run sequentially or in parallel
jobs:
  # This workflow contains a single job called "build"
  build:
    # The type of runner that the job will run on
    runs-on: ubuntu-latest

    # Steps represent a sequence of tasks that will be executed as part of the job
    steps:
      # Checks-out your repository under $GITHUB_WORKSPACE, so your job can access it
      - uses: actions/checkout@v3

      # Runs a single command using the runners shell
      - name: Run a one-line script
        run: echo Hello, world!

      # Runs a set of commands using the runners shell
      - name: Run a multi-line script
        run: |
          echo Add other actions to build,
          echo test, and deploy your project.
On
In programming, references to the word “on” typically refer to an Event. For example, in JavaScript, we have onload, onclick, onsubmit event handlers that we use to define user interactions.
In the context of an Action, the events we may be listening for will relate to our repository. For example, we may want to perform an Action when new code is pushed to the repository to check that it is correctly formatted. To do this, we would act on push.
Likewise, we may want to perform actions when a pull request is created to check that the code is ready to be merged into the master branch. To do this, we would act on pull_request.
There may also be times when we want to manually run our Action, for example, while we are still developing and testing a workflow. To do this, we would act on workflow_dispatch.
There are many events available that can be used to trigger a workflow. You can find the full list of these here
Jobs
A job is a series of steps required to execute a task. A workflow may have one or more jobs. Each job will be carried out by a cloud computer called a runner. Since different projects will require different operating systems, we can specify how this runner should be configured with the runs-on property.
In most cases
ubuntu-latestwill be a good choice. This is an industry standard linux distribution with a large community of developers.
Steps
Steps are the most granular element of an Action workflow. Together a group of steps make up a job and one or more jobs make up an Action. An example step may be to run npm install, npm run build, or another similar command.
Analogy
A chef recieves a new order for 3 meals. Each meal requires different ingredients and methods of preparation:
name: Chef
on:
  order: [lunch, dinner]
jobs:
  sandwich:
    steps:
      - name: Slice Bread Twice
        run: npm run cut --slice --bread 2
      - name: Apply Condiments
        run: npm run apply --condiments --no-mayo
      - name: Apply Filling
        run: npm run apply --filling spam
      - name: Cut Sandwich
        run: npm run cut --sandwich --angle 45deg
  soup:
    steps:
      - name: Warm Soup Portion
        run: npm run microwave --soup --time 120
      - name: Apply Croutons
        run: npm run apply --croutons
      - name: Sprinkle Cheese
        run: npm run apply --cheese --sprinkle "parmigiano reggiano"
      - name: Add Basil Sprig
        run: npm run apply --sprig basil
  salad:
    steps:
      - name: Mix Leaves
        run: npm run mix --input lettuce spinach rocket
      - name: Apply Croutons
        run: npm run apply --croutons
      - name: Chop Tomatoes
        run: npm run cut --tomatoes --size 1cm
      - name: Chop Cucumber
        run: npm run cut --cucumber --size 0.5cm
      - name: Add Feta
        run: npm run apply --cheese feta
      - name: Add Dressing
        run: npm run apply --dressing --drizzle Greek
  service:
    steps:
      - name: Check Order Ticket
        run: npm run check --ticket
      - name: Call Service
        run: npm run shout -m "Service!"
Let’s look at the same example encoded as JSON:
{
  "name": "Chef",
  "on": {
    "order": [
      "lunch",
      "dinner"
    ]
  },
  "jobs": {
    "sandwich": {
      "steps": [
        {
          "name": "Slice Bread Twice",
          "run": "npm run cut --slice --bread 2"
        },
        {
          "name": "Apply Condiments",
          "run": "npm run apply --condiments --no-mayo"
        },
        {
          "name": "Apply Filling",
          "run": "npm run apply --filling spam"
        },
        {
          "name": "Cut Sandwich",
          "run": "npm run cut --sandwich --angle 45deg"
        }
      ]
    },
    "soup": {
      "steps": [
        {
          "name": "Warm Soup Portion",
          "run": "npm run microwave --soup --time 120"
        },
        {
          "name": "Apply Croutons",
          "run": "npm run apply --croutons"
        },
        {
          "name": "Sprinkle Cheese",
          "run": "npm run apply --cheese --sprinkle \"parmigiano reggiano\""
        },
        {
          "name": "Add Basil Sprig",
          "run": "npm run apply --sprig basil"
        }
      ]
    },
    "salad": {
      "steps": [
        {
          "name": "Mix Leaves",
          "run": "npm run mix --input lettuce spinach rocket"
        },
        {
          "name": "Apply Croutons",
          "run": "npm run apply --croutons"
        },
        {
          "name": "Chop Tomatoes",
          "run": "npm run cut --tomatoes --size 1cm"
        },
        {
          "name": "Chop Cucumber",
          "run": "npm run cut --cucumber --size 0.5cm"
        },
        {
          "name": "Add Feta",
          "run": "npm run apply --cheese feta"
        },
        {
          "name": "Add Dressing",
          "run": "npm run apply --dressing --drizzle Greek"
        }
      ]
    },
    "service": {
      "steps": [
        {
          "name": "Check Order Ticket",
          "run": "npm run check --ticket"
        },
        {
          "name": "Call Service",
          "run": "npm run shout -m \"Service!\""
        }
      ]
    }
  }
}
From reading these two structures, we can see that the Chef has 4 possible jobs to perform. Each job consists of a series of steps that must be carried out in order. The “order” event will trigger this workflow, i.e. a new ticket being placed with the Kitchen.
Running an Action
Without editing the boilerplate file provided by Actions, click on the “Start Commit” button. Provide a message to describe this change, for example: “Adds example workflow”, select the option to create a new branch called “actions” then click “Commit new file”.
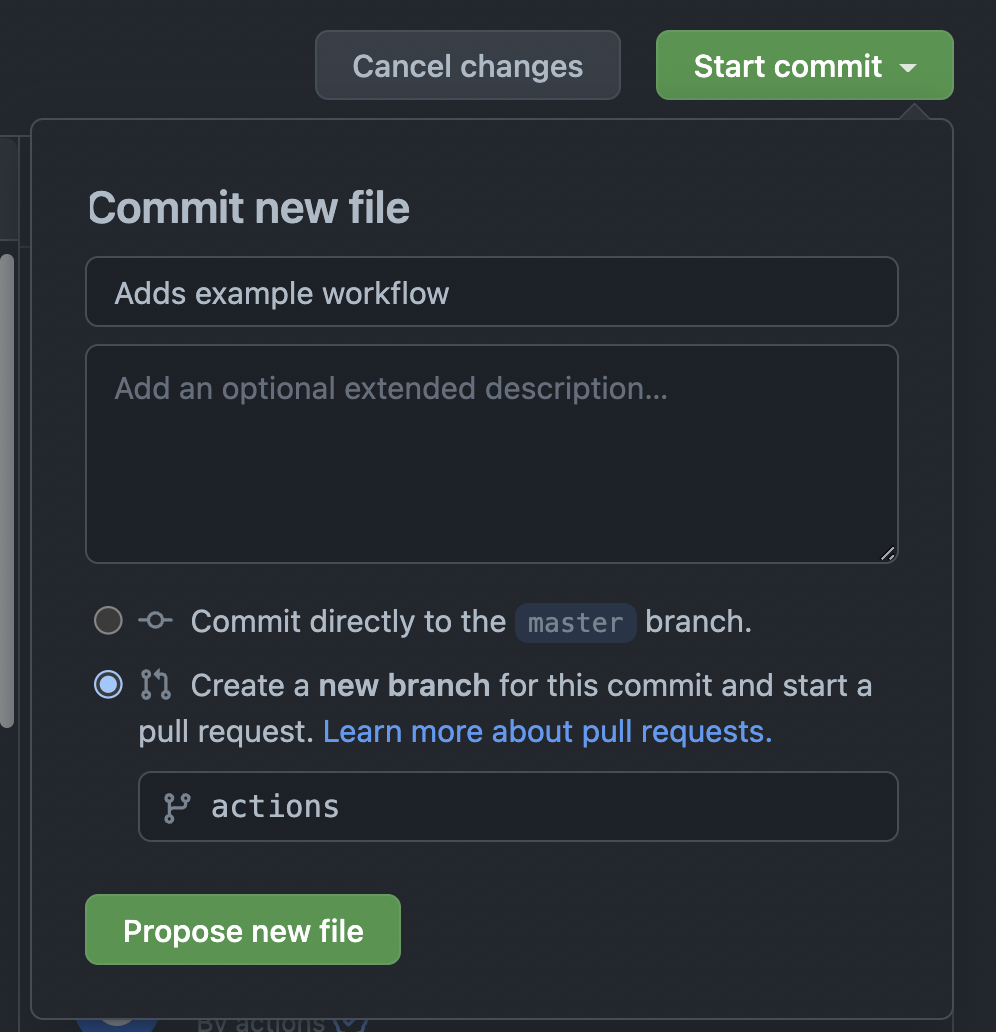
Complete the Pull Request but do not delete the actions branch as we will use this later on.
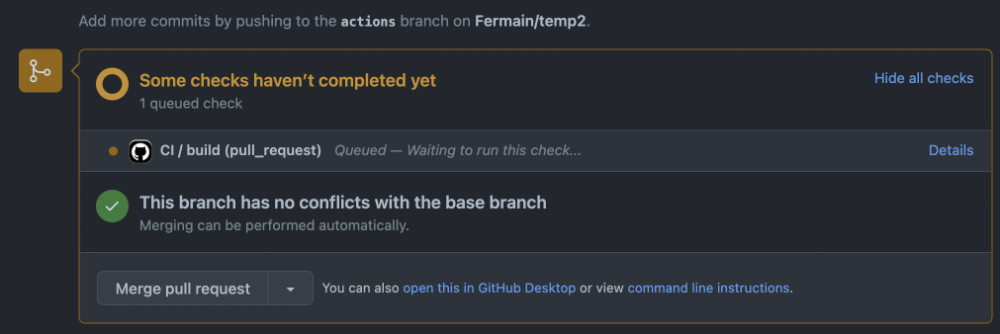
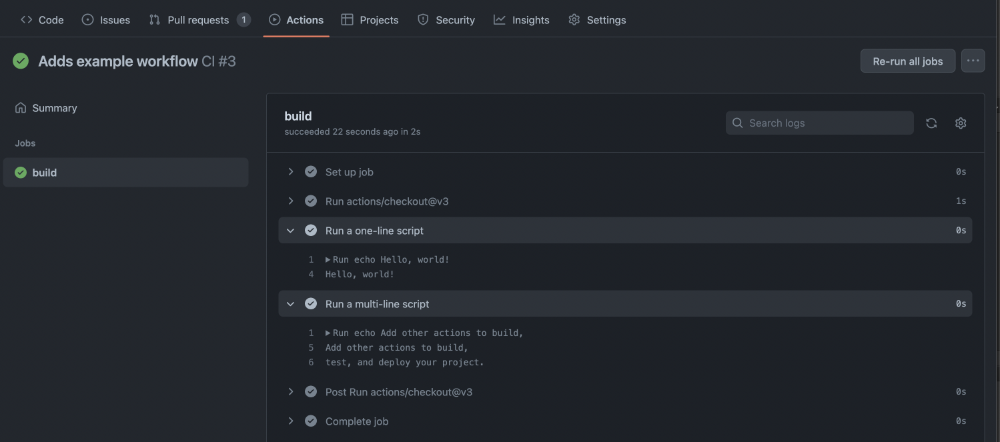
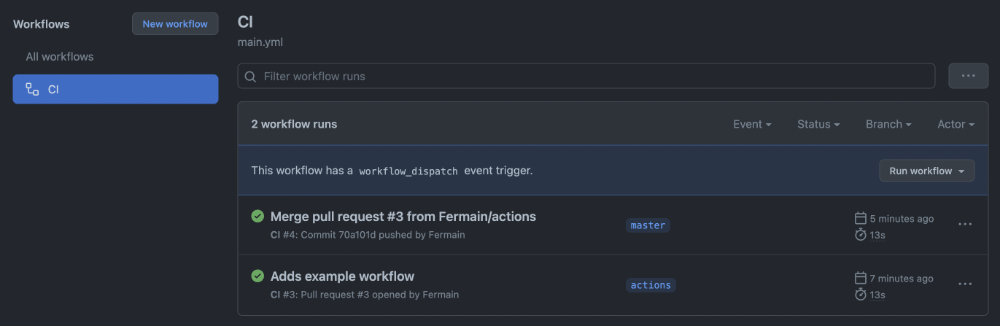
By completing this merge, we have now added a workflow to the repository. Navigate to the “Actions” tab and you should see a list of workflows that have been run. Click on the workflow that you just created and you should see a list of jobs that have been run. Click on the job that you just created and you should see the list of steps.
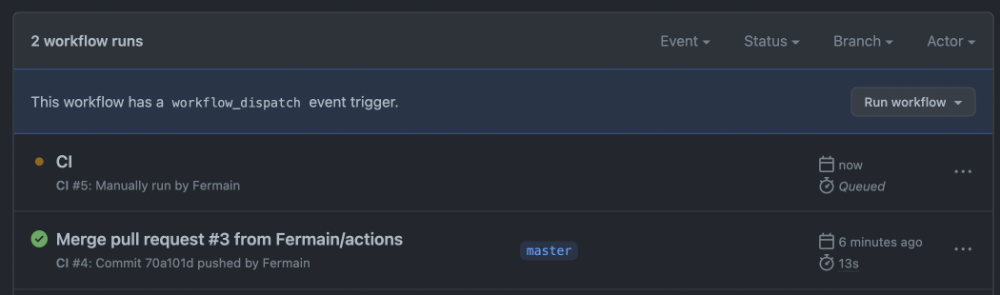
If we want to trigger this workflow again manually, we can do by selecting the name of our workflow (CI) and clicking “Run Workflow”. When the new workflow run appears in the list you can click this and watch it’s progress in real time.
Customising a Workflow
So far we have covered the process of setting up a simple, but useless action. The only purpose of this workflow is to log text to the console, indicating that it is running at the correct time only.
To demonstrate some more practical uses for Actions, we must first add some additional files to our package:
index.html
<html>
<head>
  <title>GitHub Pages Demo</title>
</head>
<body>
  <h1>Hello World!</h1>
</body>
</html>
Commit and push this new file.
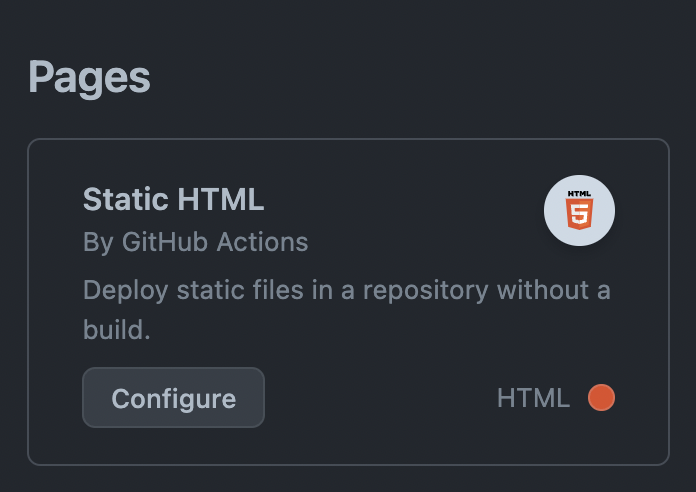
Now in the Actions tab, create a new workflow using the GitHub Pages template:
Commit this YAML file without changes, going through the same Pull Request process as before.
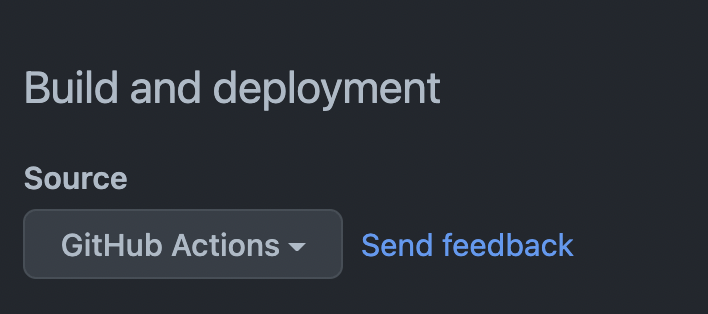
Next, go to the Settings tab in your repository and look for Pages. Under the heading Build and Deployment there is a source option. Change this to GitHub Action and you are ready to run the workflow.
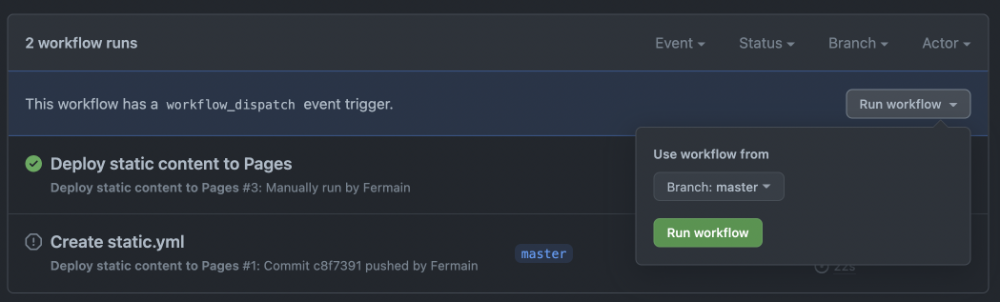
Now go back to the Actions tab and manually trigger the pages workflow:
Once this process has been completed, your content will be visible at https://userName.github.io/repoName/.
Testing your Workflow
Make a change to the index.html file and commit this into a new branch. Open a Pull Review into master and complete this. Once the deploy action has succeeded, refresh your page to see the updated content.
This pattern can be used to quickly demo web projects without the need to pay for a dedicated host. It’s beneficial for a personal portfolio page attached to your username.
Conclusion
We have now been through the process of creating a simple Continuous Integration (CI) workflow. This is the basic structure of a professional application deployment pipeline, albeit simplified. A complex application will include jobs to build and test the application code as well as deploying.
By taking advantage of Actions we can remove a significant amount of time spent performing manual deploys, allowing us to focus on the core task of writing and maintaining good quality code.