Introduction
Git is a crucial tool for any software developer and and, as such, requires more than cursory knowledge. While you may have used Git in previous modules via one of the popular client applications such as GitHub Desktop, VS Code or Sourcetree, the most direct and powerful way to use Git is via the Command Line.
In this lesson, we will use Git via its command line interface, including staging, commits, branching, merging and some common pitfalls.
Before you begin, please ensure that you have Git installed on your computer. See the Resources section for the official documentation.
Please note that the default branch of a repository may be called
mainormasteras of 2020
Initialising Git
When working on a new project, a new git repository should be initialised within that folder before any work begins. There are many ways to create a new repository, using the GitHub website, their desktop client, from your IDE or another 3rd party application such as SourceTree.
In this lesson, we will use the command line to initialise a new repository. To do this, navigate to a new project folder and run the following command:
git init
This will show a success message in the command line, along with ay useful information that may pertain to your new repository:
Initialized empty Git repository in /Users/Username/Repos/lesson/.git/
This means that we now have a fresh git repository setup in our new folder. Note that this repository only exists on your computer. We will examine the process of uploading this to a remote provider such as GitHub later on.
The initial commit
Although it may be tempting to being working on your project and commit the product of your first work session, this is not the best place for your first commit. Before starting development work, create a file called README.md. Leave this file blank and use the git add command to stage this change:
git add README.md
Now that this file has been staged we can use the git status command to check the contents of our staging zone:
git status
This command will output a status message indicating any commits or staged files:
On branch master

No commits yet

Changes to be committed:
  (use "git rm --cached <file>..." to unstage)
	new file:   README.md
As we can see that the staged file is correct, we can commit this change with a message by using the git commit -m "message" command:
git commit -m "Initial commit"
This command will output a message describing the commit:
[master (root-commit) 561a1da] Initial Commit
 1 file changed, 0 insertions(+), 0 deletions(-)
 create mode 100644 README.md
You have now committed a blank markdown file to your local repository.
Feature branches
We are almost ready to begin development now that we have git initialised and a blank README.md file committed. However, it is extremely rare to work on the default branch (master or main) of a repository. The default branch should represent finished code that is ready to be used by others. Unfinished work should be kept separately in a development branch.
A development branch may simply be called dev or development. However, this does not provide many hints about the kind of changes that it contains. Instead, we can create a new branch describing the work that we will be carrying out. For example, in our repository, we can use the git branch command to create a descriptive branch for our work:
git branch features/readme
This command will only output a message if there is an error. We can check that this was successful by inspecting our branches with the --all flag:
git branch --all
This should output a message with two branches:
  features/readme
* master
The asterisk indicates that we are currently using the default branch. We can switch branches by using the checkout command:
git checkout features/readme
This command will output a success message:
Switched to branch 'features/readme'
If we check our branches again using the --all (or -a) flag:
git branch -a
* features/readme
  master
We can now see that we are working in the correct branch. Any future commits will be added to this branch.
Updating a branch
As suggested by the branch’s name, we will be working on the README.md file. Open this file in your IDE and add some content. For example:
# Git tutorial

This repository is for a Noroff Git Tutorial.
If we check the status of our repository using the git status command, we will see that the file has been modified:
On branch features/readme.md
Changes not staged for commit:
  (use "git add <file>..." to update what will be committed)
  (use "git restore <file>..." to discard changes in working directory)
        modified:   readme.md

no changes added to commit (use "git add" and/or "git commit -a")
We can follow the advice in this message by adding and committing our work:
git add README.md
git commit -m "Adds project description"
As we will be updating this document later, there is no need to merge it immediately.
Adding new files to a branch
Adding new files is a similar process to updating existing files. Checkout the default branch, then create a new branch called features/home. Create and add a new file called index.html to the root of your project. Using git status check that the new file has been detected:
On branch features/home
Untracked files:
  (use "git add <file>..." to include in what will be committed)
	index.html

nothing added to commit but untracked files present (use "git add" to track)
This message tells us that we now have on untracked file in our project folder. Add and commit this file with the message Adds home page:
git add index.html
git commit -m "Adds home page"
Now add the skeleton of the home page to the index.html file:
<!DOCTYPE html>
<html lang="en">
<head>
  <meta charset="UTF-8">
  <meta name="viewport" content="width=device-width, initial-scale=1.0">
  <meta http-equiv="X-UA-Compatible" content="ie=edge">
  <title>Home</title>
</head>
<body>
  <h1>Hello World</h1>
</body>
</html>
Add and commit this change with the message Adds home page content. If you would like to add more content and styling to this home page, feel free. Make sure to commit on a regular basis each time you make an important change, for example:
- Adds navigation menu
- Adds hero section
- Adds footer
- Updates hero section layout
- etc
Merging branches
Now that our development work on the home page is finished, we want this work to reflect on the default branch. To do this, we must merge the changes. Before we merge, we should examine the differences between two branches to make sure that we are merging the correct changes:
git diff master features/home
This shows a message with all of our changes, in this case one new file called index.html. We can also see that the README.md file has not changed.
This readout can be quite daunting - we will explore ways to access this information in a more user friendly way later on.
You may need to use the keyboard shortcut
:qto exit this readout.
Since this is the correct work we want to merge, we can proceed by checking out the default branch which is our destination:
git checkout master
We can check the existing commit history with the command:
git log --oneline
The output message should show only one commit. Now we can merge the features/home branch into our default branch:
git merge features/home
If you run the git log --oneline command again now, you will see the changes from the features/home branch have now been brought over to the default branch successfully:
0480c6e (HEAD -> master, features/home) Adds home page content
d6ae4b9 Adds home page
b732885 (features/readme.md) Initial Commit
Deleting your branch
Although not mandatory, it is common to delete the branch you were working in once it has been merged. Over time, old branches become stale - meaning that they do not contain changes that have been added to the default branch since they were last merged.
If a branch does not contain any changes that have not already been merged into the default branch - it is safe to delete. If the branch contains changes that have not yet been merged into the default branch - it is not safe to delete.
You can delete a branch by running:
git branch -d features/home
If you attempt to delete a branch that contains unmerged changes, you will receive a warning.
Merge conflicts
Although Git is very effective at automatically merging from one branch into another, it cannot always do this perfectly. If one file has been changed in different ways on both branches, the merge will be prevented by this conflict.
To resolve a conflict, you will need to manually decide which changes should be included in the final version of each conflicting file.
We can simulate a merge conflict by creating a new branch called readme-conflict.
Instead of using two commands, this time we will use the git checkout -b flag to automatically create a new branch and then check it out:
git checkout master # ensure you are branching from default
git checkout -b readme-conflict # create and checkout your new branch
This will output the message:
Switched to a new branch 'readme-conflict'
Now add the following text to the README.md file:
# Git CLI Tutorial

> This line of text is intended to create a merge conflict. It should not remain in the final version of this file!
Add and commit this change to the readme-conflict branch. Now switch back to the default branch and merge this branch into the default:
git checkout master
git merge readme-conflict
Now we will attempt to merge our features/readme branch into the default branch. This will cause a merge conflict:
Auto-merging readme.md
CONFLICT (content): Merge conflict in readme.md
Automatic merge failed; fix conflicts and then commit the result.
Understanding a conflict diagram
Now that a merge conflict has been introduced, Git has edited the readme.md file with a conflict diagram. This shows us the two competing versions of each file, and offers us a chance to manually select the changes we desire.
<<<<<<< HEAD
# Git CLI Tutorial

> This text is intended to create a merge conflict. It should not remain in the final version of this file!
=======
# Git Tutorial

This repository is for a Noroff Git Tutorial.
>>>>>>> features/readme
Our options are:
- Accept all incoming changes (from our features/readme branch)
- Accept all current changes (from our default branch)
- Manually resolve the issue by taking some changes from each branch
Please read through these before trying them out, as we will be using method 3.
1. Accept Incoming
By accepting all incoming changes from the target branch, you remove everything in the conflict diagram aside from your version of the file:
# Git Tutorial

This repository is for a Noroff Git Tutorial.
You may do this if you are certain that the changes made to this file are unimportant. In a team setting this choice may risk removing someone elses work.
2. Accept Current
By accepting all changes from the current branch, you remove everything in the conflict diagram aside from the original of the file:
# Git CLI Tutorial

> This text is intended to create a merge conflict. It should not remain in the final version of this file!
You may do this if you are certain the changes in your incoming branch are unimportant. This is most commonly used when a file was committed by accident and should not be included in the final merge. This action will effectively delete the changes you made to this file within your branch.
3. Manual Resolution
In some cases taking all of either the incoming or current branches is not desirable. Consider these situations:
- a) We want to keep the current title but replace the rest of the content with the incoming branch
- b) We want to keep the current title and include both the current and incoming content
- c) We want to keep the incoming title and replace the rest of the content with the current branch
To reach any of these outcomes we must manually resolve the conflict:
a)
# Git CLI Tutorial

This repository is for a Noroff Git Tutorial.
b)
# Git CLI Tutorial

This repository is for a Noroff Git Tutorial.

> This text is intended to create a merge conflict. It should not remain in the final version of this file!
c)
# Git Tutorial

> This text is intended to create a merge conflict. It should not remain in the final version of this file!
The outcome that makes most sense for us is a) because it features a useful update to the title and excludes a useless update to the content. This decision can only be made by a person or group of people but cannot be made by a computer.
After applying this resolution, we can now add and commit this file, effectively completing the merge:
git add .
git commit -m "Resolves merge conflict"
In real world circumstances, merge conflicts can be quite challenging to resolve. This is because you will often be balancing the requirements of multiple people when they have made changes to the same file. The difficult aspect is not resolving the conflict, but doing so in a way that is acceptable to all parties.
Remote repositories
Although using Git locally can be quicker and more convenient, it is advisable to use a remote repository to back up your progress. There are three main advantages to doing so:
- If you lose access to your computer, you will not lose your work
- It facilitates team collaboration on coding projects
- It exposes your work to workflow tooling such as deployment pipelines
You should still use a remote repository even if you never plan to host or share your work. In this case, you may choose to set your repository to private.
Push vs Pull
You may already be familiar with a “Remote Pull Workflow” wherein a remote repository is created on a service such as GitHub and is cloned locally. Here we are effectively pulling an existing repository from a remote source.
In some cases we may already have an existing local git repository that we wish to host. There are various ways to achieve this using GUI tools such as GitHub Desktop, but we will be using the command line to demonstrate the process in it’s simplest form.
Creating a remote repository
First we will create a new repository on GitHub. This can be done by clicking the + icon in the top right corner of the page and selecting New repository.
Provide a name for your repository, set it to private and do not change any of the remaining settings. After clicking “Create Repository” you should have a blank repository with no branches, files or commits.
Setting up your remote repository with Git
Next we need to connect your local and remote repositories using the git remote command. To complete this command we will need the .git url from the remote repository, e.g. git@github.com:username/repo.git. You can find this in the Code dropdown menu under SSH in Github.
Once you have this link you can use it to replace the example in this command:
git remote add origin https://github.com/UserName/repository-name.git
Unless you see an error message, this command has been successful. You can verify this by running the git remote -v command. This will output a list of all remote repositories that are connected to your local repository.
Pushing your Local Repository to the Remote
In order to update the remote repository with the contents of your local repository - we use the git push command.
If we try this now, we will see an error:
git push origin master

fatal: The current branch master has no upstream branch.
To push the current branch and set the remote as upstream, use

    git push --set-upstream origin master
The reason we see this error is because our repository is completely blank. There is no history to attach the new changes to at all. In order to proceed we can use the --set-upstream flag to create a new branch on the remote repository:
git push --set-upstream origin master
This flag is only needed for this step. You will not use it after your remote repository has been setup for the first time.
This command will output the results of the push operation:
Enumerating objects: 11, done.
Counting objects: 100% (11/11), done.
Delta compression using up to 10 threads
Compressing objects: 100% (9/9), done.
Writing objects: 100% (11/11), 1.23 KiB | 1.23 MiB/s, done.
Total 11 (delta 0), reused 0 (delta 0), pack-reused 0
To https://github.com/UserName/repository-name.git
 * [new branch]      master -> master
If you refresh the github page for your repository you should now see your README.md file contents rendered as HTML.
Tags
Tags are a useful way to mark a fixed point in your commit history. This is most commonly used to mark a specific version of your code for release, i.e. a release tag. They can also be used to locate bugs, providing a visual representation of where and when a bug was introduced.
Just like branches, are quick and easy to create - and come with very little overhead. We create tags with the git tag command. It’s important to include the -a argument when creating a tag to provide an annotation, i.e. a name and the -m argument to provide a message, i.e. a description.
If you don’t have a package.json file, create and commit one now using the npm init command in your default branch:
npm init -y
Make sure that you are in your default branch, then update the version property of your package.json file to 0.0.1:
{
  "version": "0.0.1"
Now add, commit and push these changes to your remote repository:
git add package.json
git commit -m "Updates version to 0.0.1"
git push origin master
Now we will create a release tag at the latest commit:
git tag -a v0.0.1 -m "Alpha version of my application"
We can check that this was successful quite easily with the git tag command:
git tag
v0.0.1
Using this tag we can manage our releases, or even release different versions of our project to different hosts. For example, we may want to show off feature work under development before it is finished in a password protected staging site. When a new feature is ready for testing on the staging zone, but not ready for release on the public website, we can create a staging tag and use this to deploy our code for review.
Pushing tags
Although we have set our tag in the correct place in history, we have only done so locally. Just like a commit, what we do on our local repository is not automatically backed up to the repository. We need to use the git push command to update the remote repository with our changes.
git push --tags
We can check that this has succeeded by visiting our repository page on GitHub. There are multiple places to find this information, either on the top bar next to the branch selector, or in releases on the right hand sidebar. Click on either of these icons to visit the tags/releases page.
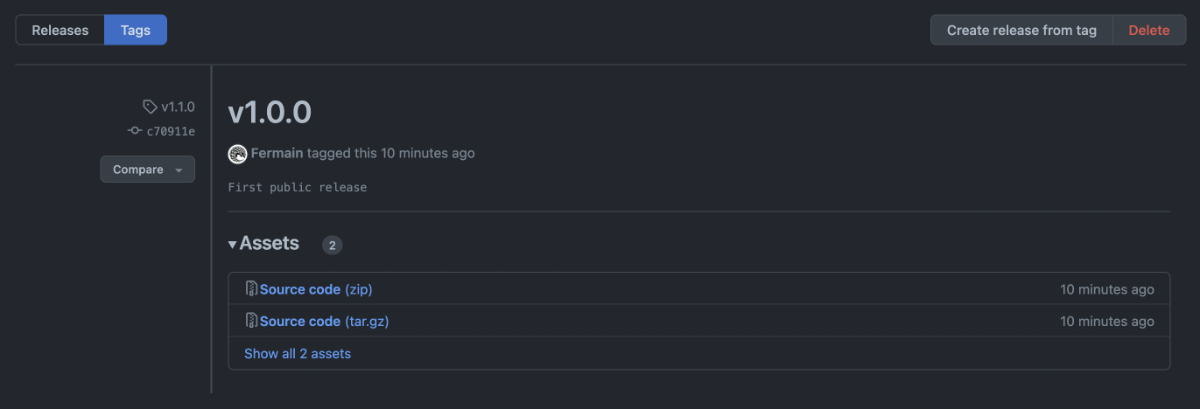
As we can see, GitHub automatically creates a zip archive of our source code at this point in time. This is very useful if the codebase is changing frequently or if many people rely upon it. For example, a tool such as Git must manage it’s versions very carefully. Introducing, changing or removing a feature without changing the version would have unspeakable consequences for the world of computing.
While it may feel less important while working on a web application, it is still important and helpful to our process to do this. It takes little effort and gets us thinking about our git history and the evolution of our applications over time.
Although you can continue to create a
Releasefrom this tag via GitHub, this does not have a significant difference to the tag itself in our case. This applies more to programming languages that must be compiled into abinarypackage before distribution, such as a native OS application.
Activities
- Read: Semantic Versioning
- Read: Think Like (a) Git
- Read: The Thing about Git
- Watch: YouTube: Rules to Git By