Introduction
So far we have examined some of the key features that WordPress offers, and how to use them to create a web application. However, in order to share your WordPress projects with the world, they first need to be hosted on a web server. In this lesson we will explore the different types of hosting, and how to deploy a WordPress site to a host.
Types of Hosting
Although all hosting involves a webserver that serves up the files that make up your website, there are different types of hosting that you can choose from. The type of hosting you choose will depend on your needs, and the needs of your project. For example, WordPress requires PHP to be installed on the server, as well as a MySQL database (a form of a data management software). Not all projects use WordPress, so not all servers will have these packages installed by default.
Static Hosting
Static hosting is used to host websites that do not have any backend functionality. For example, a simple HTML, JS and CSS website does not require any special server packages to be installed. This form of hosting is so simple and easy, that many companies offer it for free. For example, GitHub Pages allows you to host static websites for free, as long as you are using a public repository. This is a great option for hosting a portfolio website, however this type of hosting is not sufficient to host a WordPress application.
Dynamic Hosting
In contrast to static hosting, dynamic hosts are pre-installed with the correct software and can run database operations on the backend to render dynamic content. This is how WordPress and many other CMS products function at their core. Instead of storing content in static HTML files, the content is stored in a database and rendered into HTML only when it is needed. This allows for dynamic content to be displayed on the website, such as blog posts, comments, and user profiles. Dynamic hosting can be considerably more expensive than static hosting, but it is a requirement for hosting a WordPress site.
Shared Hosting
Shared hosting is the most common type of hosting, and is usually the cheapest option. Shared hosting involves multiple websites being hosted on the same server. This means that the server resources are shared between all of the websites on the server. This can lead to performance issues if one of the websites on the server is using a lot of resources.
Dedicated Hosting
Dedicated hosting is a type of hosting where you have a server all to yourself. This means that you have full control over the server, and you can install any software that you need. Moreover, as the only website on the server, you do not need to worry about other websites using up all of the server resources. This is a great option for mission critical websites, or websites that require a lot of resources such as a wiki or a forum.
Managed Hosting
Managed hosting is a type of hosting where the hosting company takes care of all of the technical aspects of hosting a website. This includes installing and maintaining the server software, and ensuring that the server is secure. This is a great option for people who do not have the technical knowledge to manage their own server, or for people who do not want to spend time maintaining their server. Managed hosting is typically more expensive than shared hosting, but it is a great option for hosting a WordPress site for a client who needs assurances about the security and reliability of their website.
Hosting Options
There are many thousands of hosting providers available, and it can be difficult to choose the right one for your project. In this section we will explore some of the most popular hosting providers, without endorsing a single product offering. Please be aware that the specific offerings of each hosting provider may change over time, so it is important to do your own research before choosing a hosting provider.
One.com
one.com offer a free 3 month trial for one-click WordPress hosting at the time of writing.
Digital Ocean
Digital Ocean offer a range of low cost hosting options, but requires experience with server management.
WPEngine
WPEngine offer managed stress-free WordPress hosting and a direct integration with Local, but it is considerably more expensive than other options.
Free Hosts
Although there are free WordPress hosting services available, we cannot recommend or endorse any of these offerings. Dynamic hosting is expensive because it requires computer resources and energy to run constantly. Free hosts are extremely popular, and share resources between all sites on the service. The result is a highly unreliable service, with poor performance and security. If you are serious about hosting a WordPress site, we recommend that you pay for a hosting service. It is crucial that free dynamic hosts are never used for professional projects.
Deploying WordPress
When your local WordPress project is finished and ready to be deployed to a host, there are a few steps that you need to take to ensure that the deployment goes smoothly. Although there are a variety of plugins that offer an easy migration - it is important to be familiar with the manual process - as these plugins are not 100% reliable. A failed migration can be quite challenging to fix without a basic understanding of how WordPress works.
Exporting from Local
Before we can migrate a WordPress site, we must first create an export package. This contains the essential files that make a project unique - including the images, custom theme, and the database. The export package can then be imported to the host, and the site will be ready to go.
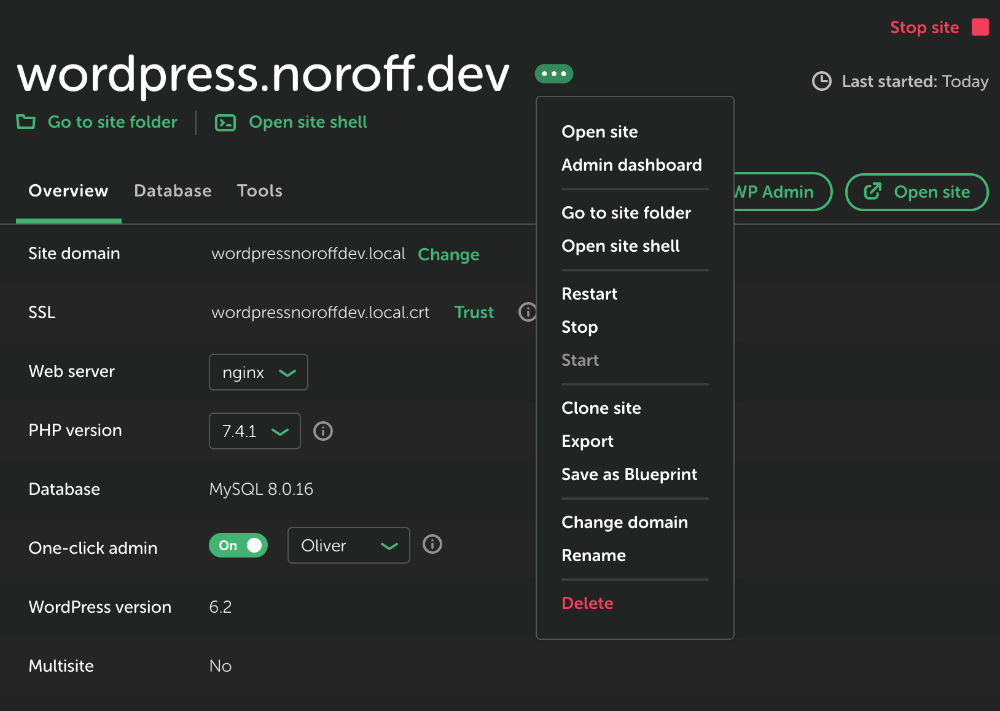
Local provides a simple export tool that can be used to create an export package. To create an export package, open the site in Local and click the Settings and Export buttons. This will create a zip file containing all of the files that are required to run the site. If you open this file, you will see a copy of wp-content folder and sql file.
Content Folder
If you are not using Local, exporting is a two step process. The first step is to manually compress a copy of the wp-content folder. By zipping this folder, it can be transferred to the server more quickly and unzipped on the server.
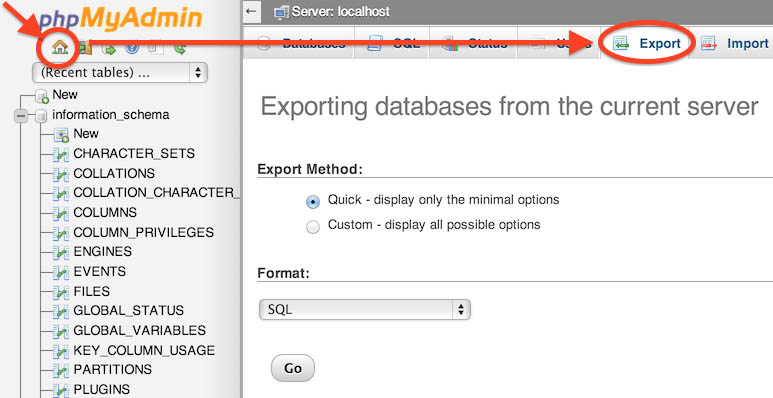
Database Export
In order to export the database without Local, you will need to use a tool such as phpMyAdmin. This tool allows you to export the database as a .sql file, which can then be transferred to the host.
Export Checklist
- I have a copy of the
wp-contentfolder - I have a copy of the database as a
.sqlfile
Importing to the Host
Once an export has been made, the next step is to import these files into the web server. Since each hosting service has a different layout, it is not possible to give an exact walkthrough for each platform. However, the fundamental steps are the same for all hosts, regardless of their UI. Before continuing, let’s look at an overview of the steps involved:
- Login to your hosting dashboard and locate the page for your website
- Create a new database or access an existing database using PhpMyAdmin
- Create or locate the access details for
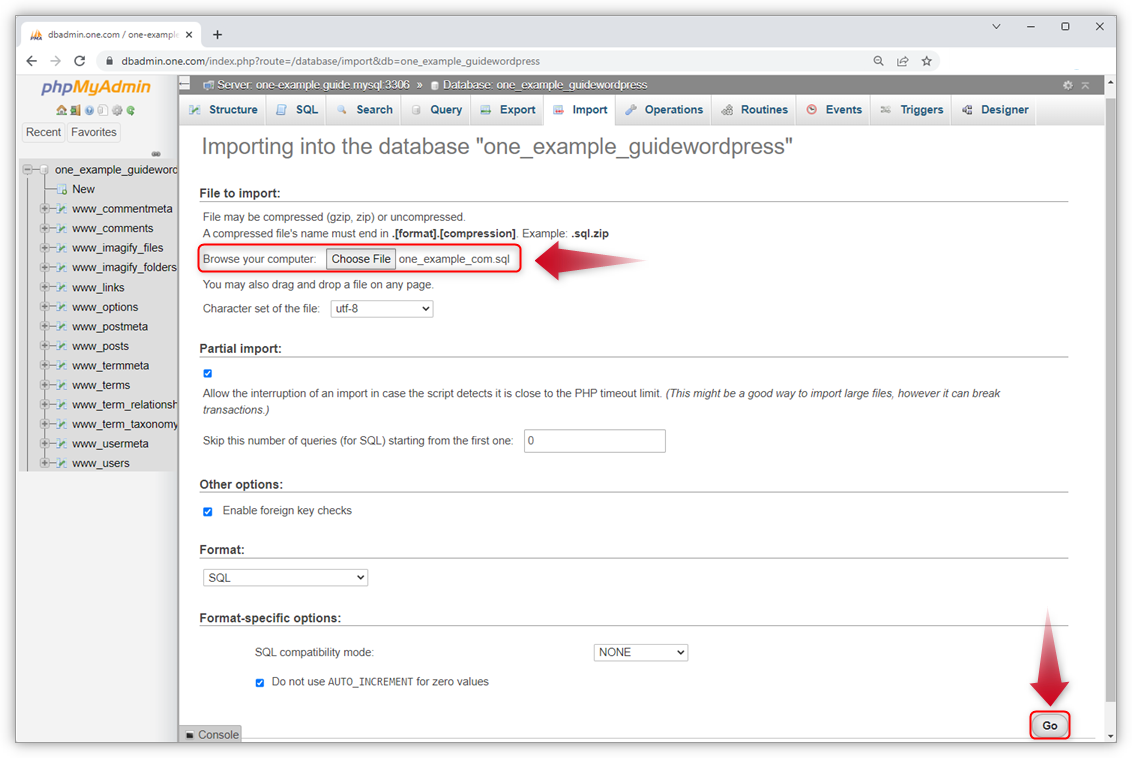
SFTP - Import the
sqlfile that was exported earlier without changing import settings - Locate the
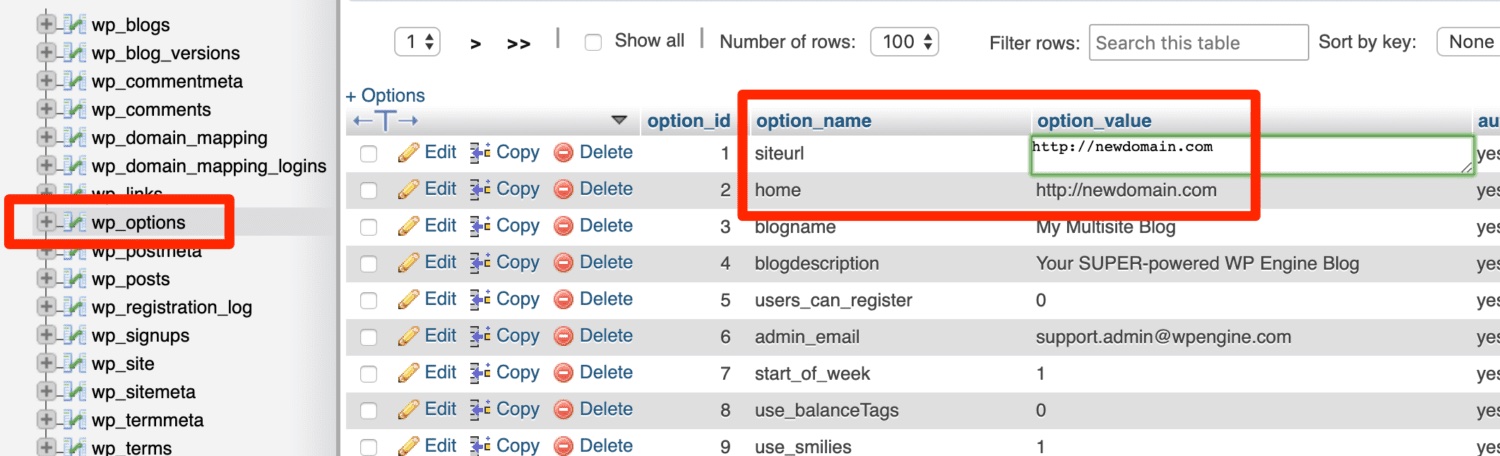
wp_optionstable and change thesiteurlandhomevalues to the new URL - Replace the contents of the
wp-contentfolder with the exportedwp-contentfolder usingSFTP - Visit the
wp-adminsection of your new URL and login with your Local credentials - Navigate to the
Permalinkspage and clickSave Changesto update the.htaccessfile - Test the site to ensure that everything is working as expected
Migrating the database
The aim of this step is to create a perfect copy of your Local database provided in the export file on your webserver. This involves using the import function within PhpMyAdmin:
Migrating files
The aim of this step is to make a perfect copy of your Local wp-content folder on your webserver. There are two ways to migrate the wp-content folder to a host:
- Using
SFTPto upload from your computer to the server - Using a file manager within the hosting dashboard to upload through the browser
The first option is the most reliable, but it requires that you have access to the SFTP details for your host. This is usually provided in the hosting dashboard, but you may need to contact your host to get these details. Once you have the SFTP details, you can use a tool such as FileZilla to upload the wp-content folder to the server.
In some cases, you may not have access to the SFTP details for your host. In this case, you can use the file manager within the hosting dashboard to upload the wp-content folder. This is usually a simple drag and drop process, but it can be unreliable for large files and may take several attempts.
Post-Deployment
Once the steps above have been completed, you may notice that your site does not work as expected. In order to finish this process, there are several quick steps needed.
Changing the URL
Within your web server’s PhpMyAdmin page, navigate to the wp_options table and edit both the siteurl and home values to match the new URL. For example, we might replace http://my-site.local with https://my-site.com.
Updating htaccess
Now that the file system and database have been successfully migrated, the final step is to access the wp-admin section of the hosted site and navigate to the Permalinks page. This will update the .htaccess file with the correct rewrite rules for the new URL, solving any remaining 404 issues that may be present.
Activities
Research the different dynamic hosting options available and select a host to continue with. Register with your host and go through the steps in this lesson to deploy your WordPress site to the host. If you run into issues with this process, make a post on the CMS channel to seek assistance - you might find that many others have tackled the same problem in the past.