Introduction
Themes are great for getting a site set up with a layout that works, but what happens if you would like to change a few aspects of the look and feel while keeping the same theme?
Child themes are used to modify a theme installed on your site. You keep the original theme as a parent theme, but can then target specific elements and files to update and change in the child theme.
When your website loads, the styles in the child theme are applied last. As per CSS rules, the last declared style takes precedence. If you don’t change the child theme’s style, the parent theme’s original styling will be applied.
For template files, those in the child theme are loaded first. If they aren’t present in the child theme, the parent theme’s templates are used instead.
WordPress and its themes receive regular updates. Using a child theme ensures that your custom styling remains intact, even when the parent theme is updated. This way, you get the latest features for your theme, without breaking the unique changes you’ve made.
Note: You should be careful about choosing a parent theme for your site because the more you have to modify in the child theme, the more work you’ll have. Also, note that PHP usage here is solely for styling purposes. Please do not feel like you need to learn PHP as a programming language in order to understand this module.
Preparation
Before we begin, please ensure that you have the Local app running and that you have created a fresh WordPress project. Start the site and log into the admin panel at your-site.local/wp-admin.
Setting up your IDE
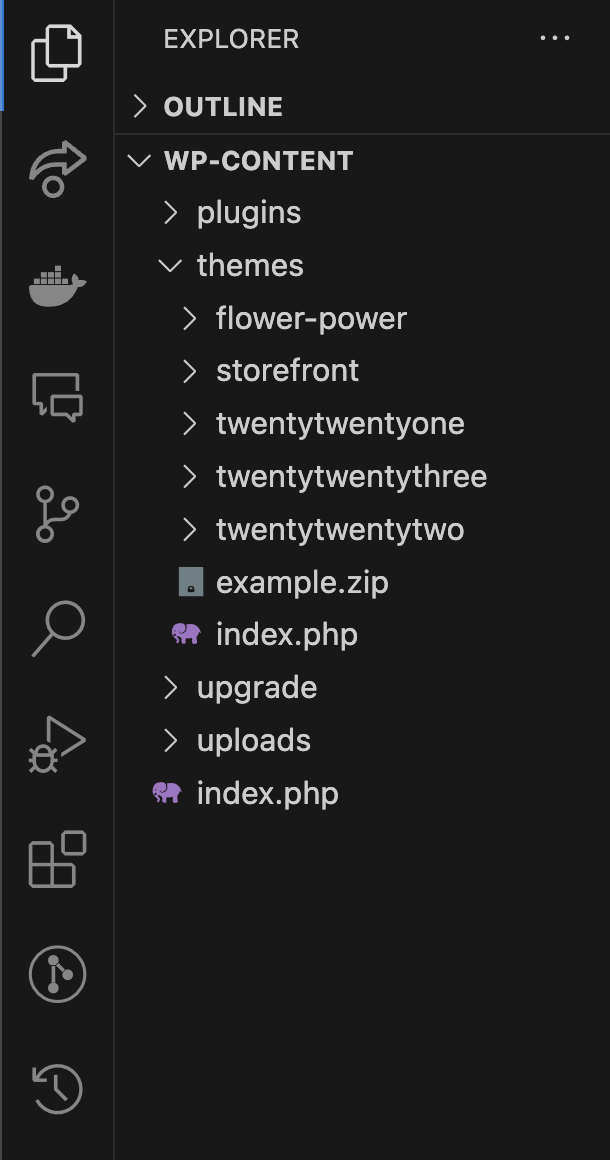
Next, open your WordPress files in your text editor. Since we never edit the contents of wp-admin or wp-includes it is best to open the wp-content folder directly in your editor. This will expose many useful folders such as:
plugins- This is where plugin files are located. In some emergency situations, manually adding or removing plugin files can be required.themes- This is where theme files are located and where we will be working in this lesson.uploads- This is where all uploaded files are stored. This includes images, videos, audio, and other files uploaded through the WordPress admin panel. It’s best not to touch this folder directly as it is managed by the WordPress admin panel.
Your editor file explorer should look something like this:
Installing a Parent Theme
Please ensure that you have the Storefront theme installed and activated on your site. If you don’t, you can install it by going to Appearance > Themes and searching for Storefront. You can find the official page for this theme here: Storefront.
Setting up a Child Theme
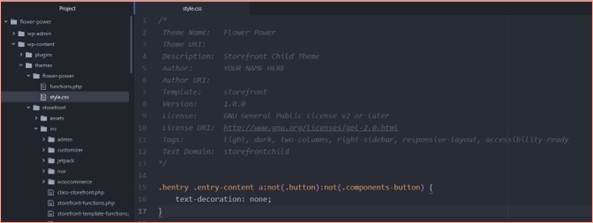
Open your WordPress files in your text editor. Go to wp-content > themes and create a new folder called flower-power. It’s a common to name the folder as your theme name followed by -child. For example, storefront-child would be another valid folder name.
Setting up Git
Just like any other coding project, it is important to use Git to track our changes and share our work. Instead of tracking the entire WordPress application, we will just be tracking the theme folder. In order to do this, Git must be initialised in the correct location. Git can be used in many ways, however, the most direct way is to use the command line:
git init ./themes/flower-power
Alternatively, you may select this folder using GitHub Desktop:
- File > New Repository
- Select the
flower-powerfolder - Name the repository
flower-power - Click Create Repository
Inside this folder create a style.css file.
Adding a style.css file
In WordPress, the style.css file is used to store the theme information. This is where you can add the theme name, author, and other information about the theme. It is also where you can add custom styles for your theme.
Copy the following and add it directly to your stylesheet. Customise the data with your information, such as your name. You can read more about this file here: style.css
/*
 * Theme Name: Flower Power
 * Theme URI:
 * Description: Child theme for Flower Power
 * Storefront Child Theme Author:
 * Author URI:
 * Template: storefront
 * Version: 1.0.0
 * License: GNU General Public License v2 or later
 * License URI: http://www.gnu.org/licenses/gpl-2.0.html
 * Tags: flowerpower
 * Text Domain: flowerpower
 */
Now, navigate to the admin page of your site and go to Appearance > Themes. You should see your child theme listed. Click activate on your child theme to view your changes. Each time you make a change, you will need to refresh the site to see it in action.
Storefront simplifies the process of creating child themes, so there’s no need to use @import in the child theme’s style.css file. When using a parent theme, it’s important to read the documentation - especially sections covering how to setup child themes. Different themes may have different requirements depending on their design.
Activities
Activity 1
READ
Page: Child Themes for a tutorial by WordPress on adding a child theme.
Activity 2
WATCH
If you would like to follow along with a video tutorial to set up a child theme: WordPress: Building Child Themes
- Building on a solid foundation
- Creating a child theme
Overriding Styles
The easiest way to update the site is to use CSS in your child theme to override the styles applied to your website. You can use CSS just as you would normally do to override and create new styles for your site.
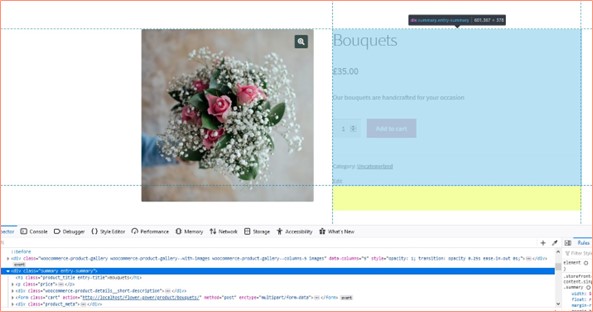
Let’s say we wanted to remove the underline from the buttons on our site. First, we need to find out what selector is styling the button. We can look at our developer tools for this.

In this case it is:
.hentry .entry-content a:not(.button):not(.components-button) {
  text-decoration: underline;
}
Now we can go to the stylesheet in our child theme and override this style.
Once added, you’ll see the underline from the button has gone as the child theme’s style overrides the parent’s styles.
You can do this with any style on your site. Find out what selector is styling the element, and override it using your child theme’s stylesheet.
Sometimes it can take a while to search through the HTML and CSS to find how certain elements are styled. It’s a good idea to use your developer tools to test and find the styling you’d like to adjust. Remember that these changes are not saved by default, so if you refresh the page while working in devtools you may lose your progress!
In some cases, making a copy of the parent stylesheet can be a useful way to find the selectors you need to override. You can copy the parent stylesheet into your child theme and then delete the styles you don’t need. This way you can see what styles are being applied to your site and find the selectors you need to override.
Your child theme stylesheet is not just for overriding styles but can also create new styles. Consider splitting your stylesheet into sections for overriding and new styles. This makes life easier when it comes to updating the parent theme in the future.
Editing template files
Another way to edit your website using a child theme is to edit the template files.
Let’s say we want to add a generic image below each product. First, we’d find out which template edits our product pages. In this case we’re looking for <div class="summary entry-summary">.
We can use an IDE to search for that element in the theme files. In this case, it’s in content-single-product.php in the Storefront theme template files. By making a copy of the file, including any folders it may reside within - we can override this template file in our child theme.
Here is where the product details are added to <div class="summary entry-summary">:
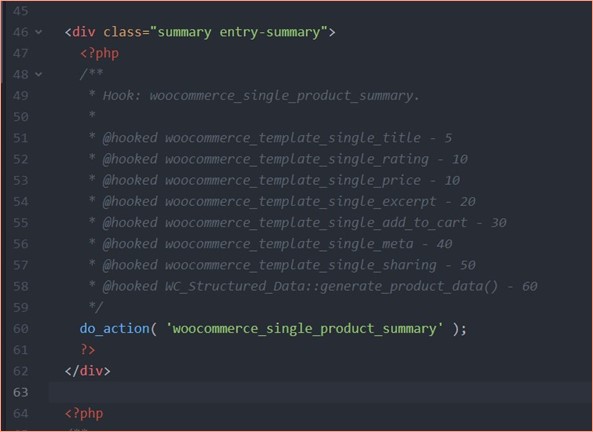
We don’t want to edit what gets output in the PHP; we just want to add an image after the div has closed. In order to do this, the image tag has been hardcoded below the div:
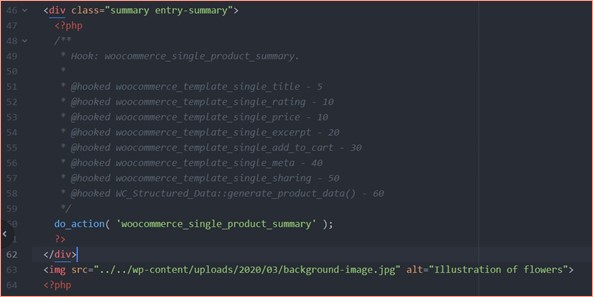
On all the product pages, you will now see an image added underneath the product info. Try adding some additional markup to this section in order to get a feel for working on a template fragment.
Activity
WATCH
For more on working with child themes, please watch the following video: WordPress: Building Child Themes
3. Child themes and CSS
4. Working with function files
5. Working with template files
6. Adding new functionality
Lesson Task 1
Brief
Experiment with styling child themes.
Level 1 Process
- Set up your child theme as covered in Lesson - ‘Child themes’
- Try adding some unique styling to your styles.css file and see it pull through on your website. Perhaps update the body colour or choose another element to style and make sure everything comes through correctly.
Level 2 Process
- Select a theme from the WordPress theme directory and install it on your site.
- Create a child theme for this new parent theme.
- Adapt the child theme by overriding some of the styles in the parent theme.