Introduction
JSDocs is a way for us to document our code. Some of the major benefits include:
- It gives developers information about your code when they are using it
- It converts your code automatically to TypeScript
- It automatically generates documentation for you
How to use JSDocs
JSDocs works by adding information between special opening and closing comment tags, /** **/. This code would go above a function or a React component.
NOTE: Any lines between the /** and **/ comment tags will need to have a * at the front. VS Code will automatically insert this for you though if you press Enter while your mouse cursor is positioned inside of the JSDocs comment.
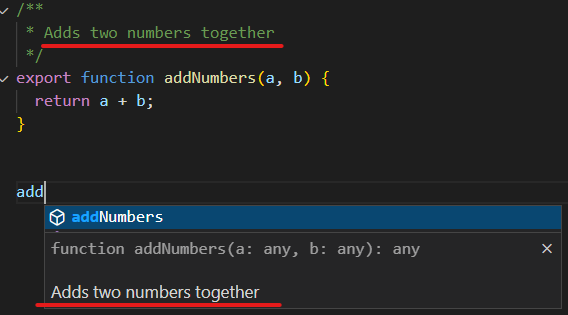
We are going to add a function description between the /** and **/ comment tags. We are first going to do this for a normal JS function and then we are going to do it for a React component. You can use JSDocs for both normal JavaScript functions as well as React components.
NOTE: JSDocs is smart and will check what parameters your function has as well as check if it returns anything. It will then automatically add these fields for you when you begin adding JSDocs for your function. It’s therefore a better flow to add JSDocs at the end of writing that function or React component so that you can take advantage of this autocompletion.
Normal JS Function:
/**
 * Adds two numbers together
 */
export function addNumbers(a, b) {
  return a + b;
}
React component:
import React from 'react';

/**
 * Displays a message to the user
 */
export default function Greeting() {
  return <div>Hello user!</div>;
}
If you were to use the above function or component, you would get a tooltip that contains what’s written in our JSDocs comment. This is very useful for other developers who want to use our functions and/or React components:
So far we’ve only added a description for our function and React component. This is useful on its own but we can extend the functionality to make JSDocs even more useful.
@param
We can list our parameters and their types which is very useful for other developers when they are using your code.
NOTE: TypeScript can automatically add types to your code if JSDocs types have been added. If there are JSDocs types in a TypeScript file and typing hasn’t been done on the TypeScript code itself then you will see a white squiggle line under the function name which says JSDoc types may be moved to TypeScript types in the tooltip. In Quick Fix is the option Annotate with type from JSDoc which will automatically convert the function for you.
The following is how it would look when adding the @param property.
@param follows the following structure:
/**
 * Example function
 * @param {dataType} parameterName parameterDescription
 */
dataType: Data type of the parameter, e.g. string. Use * for any data type, however, you want to typically avoid this
parameterName: This is the name of the parameter
parameterDescription: This is the description of the parameter
Practical example
Let’s have a look at a practical example. We have refactored the addNumbers function from earlier in this lesson to include the parameter types:
/**
 * Adds two numbers together
 * @param {number} a First value
 * @param {number} b Second value
 */
export function addNumbers(a, b) {
  return a + b;
}
@returns
You can use the @returns field to specify the return type and give a description.
/**
 * Example function
 * @returns {dataType} returnDescription
 */
dataType: Data type of the return, e.g. string. Use * for any data type, however, you want to typically avoid this.
returnDescription: This is the description of the return
Practical example
Let’s have a look at adding the @returns in a more practical example. We will extend our addNumbers function further so that it includes the @returns property.
/**
 * Adds two numbers together
 * @param {number} a First value
 * @param {number} b Second value
 * @returns {number} Sum of params
 */
export function addNumbers(a, b) {
  return a + b;
}
@example
@example is one of the most important properties to add and you should try to always have it added. It’s incredibly helpful if done correctly and it simply looks very professional due to all the markdown syntax highlighting.
The @example field is added at the bottom of the JSDocs comment and can span over multiple lines. It uses markdown so you can add syntax highlighting like you would on Discord. You use the @example field to demonstrate how to use the function or React component.
Before we continue, let’s look at how we add syntax highlighting with Markdown. You should already know how to do this on Discord, but we will cover it again for good measure.
Adding syntax highlighting with Markdown
NOTE: You can interchange js below with jsx for React, ts for TypeScript and tsx for React TypeScript.
```js
console.log('Hello world');
```
Adding an @example example
Let’s look at adding an @example property to our addNumbers function.
We begin by adding the @example property. We then add a Markdown code block with JavaScript Syntax highlighting (js). We show how to use the function so that others can easily use the function or React component themselves without looking into the code.
/**
 * Adds two numbers together
 * @param {number} a First value
 * @param {number} b Second value
 * @returns {number} Sum of params
 * @example
 * ```js
 * // Add two numbers together
 * const a = 1;
 * const b = 2;
 * const sum = addNumbers(a, b);
 * // expect sum to be 3
 * ```
 */
export function addNumbers(a, b) {
  return a + b;
}
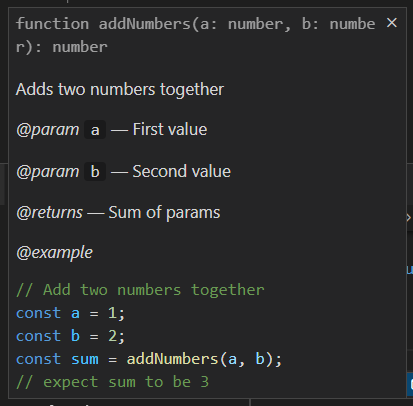
Your tooltip will now look as follows.
Note the following in the tooltip:
- The data types at the top (
function addNumbers(a: number, b: number): number), lets a developer quickly see what data types they need to be passing in. - The
@examplefield. This lets a developer quickly see how to use the function. It also adds an extra level of professionalism.
Optional parameters
You can add [ ] square brackets around a parameter name to make it optional.
/**
 * Example function
 * @param {dataType} [optionalParameterName] optionalParameterDescription
 */
This is the equivalent to the following TypeScript:
type MyType = {
  optionalParameterName?: dataType;
};
Practical example
In this example we look at adding an optional parameter to our addNumbers example:
/**
 * Adds two numbers together
 * @param {number} a First value
 * @param {number} [b] Second value
 * @returns {number} Sum of params
 */
export function addNumbers(a, b = 10) {
  return a + b;
}
Default values
You can also specify a default value. In this example, we are setting optionalParameterName to 10:
/**
 * Example function
 * @param {dataType} [optionalParameterName=10] optionalParameterDescription
 */
@typedef
@typedef is for defining custom types that you want to refer to repeatedly. It is like creating a type/interface in TypeScript.
/**
 * Number or string containing number
 * @typedef {(number|string)} NumberLike
 */

/**
 * Adds two numbers together
 * @param {NumberLike} a
 * @param {NumberLike} b
 */
export function addNumbers(a, b) {
  return a + b;
}
Complex objects
We often deal with objects that are complex. There are multiple ways to deal with this in JSDocs.
Option 1: Destructuring
This is like destructuring in TypeScript.
/**
 * @param {{a: number, b: string}} myObject Option description
 */
Option 2: Dot notation
This functions like object dot notation.
/**
 * @param {Object} myObject Object description
 * @param {number} myObj.a "a" property description
 * @param {string} myObj.b "b" property description
 */
Option 3: #typedef
You can create a @typedef type and use that as your @param.
/**
 * Number or string containing number
 * @typedef {(number|string)} NumberLike
 */

/**
 * Adds two numbers together
 * @param {NumberLike} a
 * @param {NumberLike} b
 */
export function addNumbers(a, b) {
  return a + b;
}
Generating documentation
One of the benefits of JSDocs is that it can generate documentation. This documentation is in HTML and is already styled for you.
Let’s look at generating the documentation.
- Add the
jsdoclibrary to your dev dependencies:
npm i jsdoc --save-dev
- Run the JSDoc binary against the file you want to document:
You can run the JSDocs generator against a single file. For example, if your file was called your-file.js, then you would run the following command:
node_modules/jsdoc/jsdoc.js your-file.js
- Open the generated HTML:
If you run the command and have no errors then you will see that an out folder gets generated. This entire folder is your JSDocs documentation folder. Open the index.html file with the Live Server extension to open the documentation.
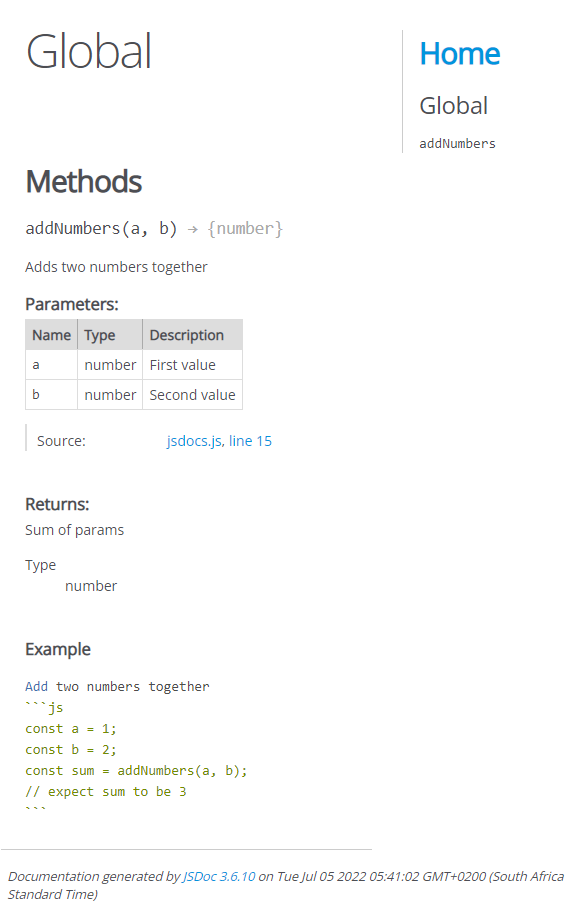
We have documented the addNumbers function from earlier and run the JSDocs generator on the file that contained this function. Our documentation generated looks as follows:
Note: The styling and layout might look slightly different to yours if the JSDocs versions are different. This is not an issue and you’ll want to make sure you’ll use the latest stable version of JSDocs.
Generating documentation for a whole project
We previously had a look at generating documentation for a single file, but this isn’t of much use. Our apps are likely going to have many files with many different functions.
Recursively running through files
There is an -r flag to run recursively through folders to get all the files (node_modules/jsdoc/jsdoc.js -r ./), however, this can be problematic.
You might scan irrelevant folders such as node_modules, which will likely either throw errors or generate documentation for functions that you aren’t concerned about.
We will instead use a configuration file which will be demonstrated below.
Configuration file
We can create a configuration file which allows us to include and exclude folders from being generated. This is the preferred setup and is how you should setup your project.
-
Create a
conf.jsonfile in the root of your project. -
Add the following code to
conf.jsonand save the file.
{
  "source": {
    "include": ["."],
    "exclude": ["node_modules/"]
  }
}
This code will:
includeall files and folders from the root directory when generating the documentation, meaning that everything is impactedexcludethenode_modulesfolder when generation is taking place.
The end result is that everything will be used, excluding the node_modules folder.
- Run JSDocs with the configuration file:
You now need to run JSDocs with the configuration file flag (-c) as well as the recursion flag (-r):
node_modules/jsdoc/jsdoc.js -c ./conf.json -r
- Add the above command as a script:
Trying to remember the paths, flags and filenames each time we need to create the documentation is problematic and not worth the effort. We should instead add it as a script to our package.json, such as under the name docs, and then we just run this script e.g. npm run docs.
NOTE: We will only need to run jsdoc instead of node_modules/jsdocs/jsdocs.js when using our package manager.
In package.json, under scripts, add the following property:
"docs": "jsdoc -c ./conf.json -r",
Your file will then look something like the following:
  "scripts": {
    "docs": "jsdoc -c ./conf.json -r",
  },
Now to create the documentation for your file, you simply run one of the following commands, depending on which package manager you used:
npm: npm run docs
yarn: yarn docs
JSDocs video
We take a look at the basics of JSDocs and how to add them to a function.
Lesson task
JSDocs is very commonly used in the workplace to assist other developers as well as yourself. You will practice adding JSDocs to a provided function.
Goal
The goal is for you to demonstrate that you can apply JSDocs to a function.
Brief
NOTE: Lesson tasks do not get submitted on Moodle and are not assessed by tutors. They are mainly there for you to practise what you have learned in the lesson.
Level 1 process
- Copy the following code to an empty JavaScript file.
function addNumbers(a, b) {
  const result = a + b;
  return result;
}
-
Add JSDocs, which must include:
2.1 A description for the function
2.2 @param for both the parameters, including a type and description
2.3 @returns that include both a type and description
2.4 @example that includes code added in a JavaScript markdown block